
Recommendations and suggestions for everything from upgrade problems and optimizing storage, to fixing privacy issues and applying safe mode
Windows1 is definitely the most widely spread desktop OS in the world. The Microsoft-elaborated operating system was used by more than 75% of desktop customers2 as of March 2021 – almost five times more than its largest rival, Apple’s macOS.
The most fresh version of the OS, Windows 10, first came up in 2015 as the successor to Microsoft’s much-criticized Windows 8. It has since been known as the most widely-spread stage of OS, having been activated on more than one billion PCs all over the world.
Nevertheless, this ever-increasing popularity doesn’t imply the operating system is absolutely ideal. Even though Windows 10 has got far fewer security problems than certain of its predecessors, in particular, Windows 7 and Windows Vista, the OS also is furnished with its very own range of challenges, even though thankfully the majority of them happen only seldom and are not that essential.
These may include rare slow load times, pointlessly complicated localization features, alerts you obviously didn’t expect, and, in some cases, you could even see that your storage capacity is much lower than you initially thought. Even though these aren’t that problematic, they can turn out to be irritating, especially when faced on a permanent basis without a straightforward resolution.
For this reason, we’ve made the decision to review the 17 most typical Windows 10 issues as well as render certain working recommendations on how to resolve them rapidly.
Failure to upgrade from Windows 7 or Windows 8
One of the most typical troubles with Windows 10 can occur right away when you try to perform an upgrade from Windows 7 or Windows 8. This may take the shape of an alert that the ‘Get Windows 10’ (or GWX) utility is not compatible, or the app may not come up at all, which will result in an interrupted update. These are a few steps you can implement to eventually make the update accomplished:
- Go to the Control Panel and then start Windows Update and make sure that the computer is fully up to date. In case updates fail to go through, launch the Windows Update Troubleshooter (check below, under number 3)
- Start the Media Creation Tool. Don’t rest upon GWX: go to https://www.microsoft.com/en-us/software-download/windows10, choose Download tool now, save the tool, and launch it on the device you would like to upgrade. In case this didn’t take place for you back when Windows 10 was released, try it again at this point of time – the utility has been enhanced.
- Be sure that hardware Disable Execution Prevention (DEP) is turned on in the BIOS, referring to your motherboard user guide for assistance in case you need it. In case you still have got Windows 10 issues, refer to the Start Menu to look for ‘performance’, launch Adjust the appearance and performance of Windows, choose the Data Execution Prevention tab and switch DEP on for all applications and services, then restart and repeat again.
Failure to upgrade to the fresh Windows 10 version
Windows 10 gets crucial updates every so often, for instance, the May 2020 Update (codified 2004) and the October 2020 Update (codified 20H2). Each of such updates gives new features to Windows 10, plus a range of bug repairs and much more.
In spite of the fact that Windows 10 is the most stable release so far, one of the most regular Windows 10 issues experienced by the platform clients is updating to the fresh version of Windows 10 once it’s released.
On the other hand, any updates similar to this won’t come up as applicable to every customer, and this implies you’ll need to refer to manually updating your OS instead.
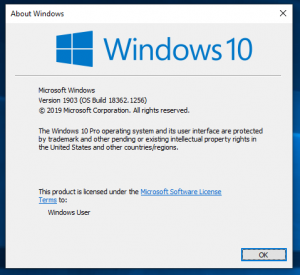
Before you begin the upgrade process, you’ll have to inspect which Windows 10 version you’re currently running. You can do this by referring to the “About Windows” menu.
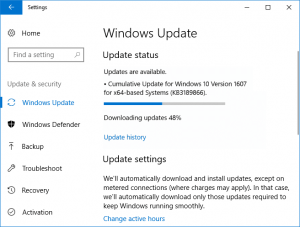
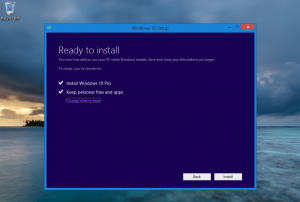
In case you’re ready to install the fresh version of Windows 10, you can refer to the Windows Update Tool, even though the Media Creation Tool option is the more reliable process. You just have to download it3, install it and apply it to manually upgrade your computer to the final version available.
Plus, be sure you’ve opted to store the private data and programs and click Install to keep your documentation, programs, and most of your preferences untouched. At this point, once you hit install, it should begin installing the latest version of the OS.
Your free storage essentially decreased compared to the initial status
Upon installing Windows 10, the obsolete version of the operating system is hidden in the background occupying the considerable disk space.
You might be asking as to why this took place, and the answer to this question is that Microsoft isn’t quite as controlling as some other huge tech corporations. Instead of making customers update their hardware and never look back, Microsoft keeps a hold of the crucial data that made up your initial OS in the C:/ drive. This has got its own purpose. For instance, if you don’t like the brand new Windows 10 and make the decision to get back to the initial OS that you might be more accustomed to.
In case you are happy with the new operating system and would like to get rid of the previous one for good, then select the Windows Start button and specify “cleanup” to automatically inspect the system. A “Disk Cleanup” utility should come up before you in the search area box. Click on it to start the utility.
A drive selection box should come up. Just choose the drive your operating system is installed on. The default drive should come up first which is normally the C:/ drive. In case you’re pretty sure that this is the main drive where your operating system is installed, click OK. Windows should inspect your system for a certain period of time and then a box will come up.
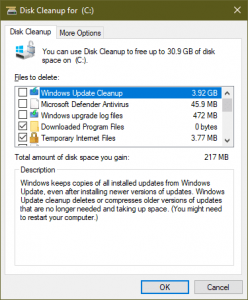
Be careful, two events could occur at this point. You could be given a list of files to remove immediately, one of which is “Previous Windows Installation(s)”, or if that feature is not rendered, you will have to choose the “Clean up system files” feature in the bottom left area.
Consider reading: Werfault.exe Error in Windows 10. Guide to Repair.
Windows will implement certain additional calculations and provide you with another very similar-looking box, however, this time with the capability of removing previous windows installation(s). You might need to scroll down to locate it, however, it should be taking up a considerable volume of drive space, in our case, 10GB. Choose this feature and don’t forget to click OK. In the special message box that comes up asking if you’re confident you would like to send this, choose Delete Files, and that’s it.
Windows Update fails to run
A lot of customers have reported troubles with Windows Update in Windows 10. Make sure first that you’ve upgraded to the Windows 10 Fall update (check above, under number 2). In case you’re still experiencing difficulties, download and launch the Windows Update Troubleshooter, then restart and attempt to update again.
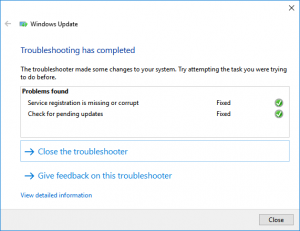
In case the Windows 10 issues still persist, you might have to investigate the case a bit more. In the first place, be sure that System Restore is set up properly (check below, number 7) and generate a restore point. Once this is successfully accomplished, apply the Win+X hotkey and choose Command Prompt (Admin), then specify ‘net stop wuauserv’ (without the quotes) and press Enter, then indicating ‘net stop bits’ and hitting Enter. You should encounter confirmations that each service was either terminated or wasn’t active. Then, go to Explorer and proceed to C:\Windows\SoftwareDistribution. Get rid of its contents, such as any sub-folders. Now restart, launch Windows Update, and select Check for updates.
Switch off forced updates
In case you act like we do, you set up initial Windows releases so that they wouldn’t be installing updates automatically – one forced reboot is definitely too much.
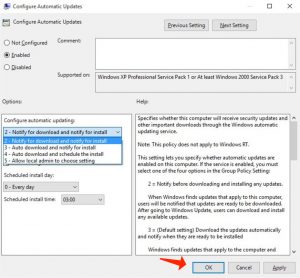
There is a workaround for customers working with Windows 10 Pro: from the Start Menu, look for ‘gpedit’ and launch the Group Policy Editor. Open Computer Configuration in the left-hand pane and proceed to Administrative Templates\Windows Components\Windows Update. Double-click Configure Automatic Updates in the list, choose the Enabled radio button, and in the left-hand box choose 2 – Notify for download and notify for install. Then click OK, and you’ll be alerted whenever there are updates in place – regretfully, they’ll be a day-by-day irritation in case you’re client of Windows Defender4.
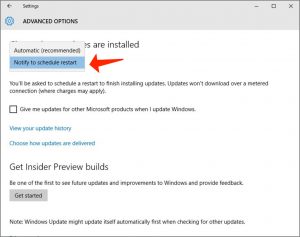
The Group Policy Editor isn’t presented on Windows 10 Home, however, we would strongly recommend you at least run Windows Update, select Advanced options, and choose Notify to schedule reboot from the Choose how updates are installed list. At this point, all Windows 10 clients might wish to click Choose how updates are delivered and make sure that Updates from more than one place is either off or define the value to PCs on my local network.
Switch off unwanted notifications
Windows 10 released Action Center, a panel placed to the side of the display which gives the summary of all the notifications your system gives you so you can deal with them altogether. It’s a handy parameter but it can also become clogged with notifications quite fast if they’re not regularly dealt with.
Notifications can be different, starting with the crucially important system alerts to random social media or software updates. There is, nevertheless, a solution to filter out the alerts you are not interested in.
You can go to Settings, proceed to notifications & actions, and you’ll face certain toggle buttons which you can set on an app-by-app principle. You may also just proceed straight to the settings screen by looking for ‘notification and actions’ in the search area.
Repair privacy and data defaults
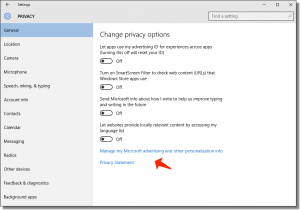
We’re not really satisfied with some of the data-sharing default options in Windows 10, and we would suggest all clients review them from time to time. Go to the Start Menu to look for and launch the Settings app, then select Privacy. In the left-hand area, you’ll encounter many places where your PC could be sharing certain information. It’s worth devoting time inspecting that you’re comfortable with letting programs use your PC’s camera, microphone, account data and so on, and where you are, inspecting that no surprise programs come up in the lists. Keep in mind, however, that the default Feedback & diagnostics parameter is to transfer crucially important data to Microsoft.
In case you are the fan of Windows Defender, click the back arrow, and choose Update & Security, then Windows Defender. Agree that you’re satisfied with the default behavior, which is to activate Cloud-based detection and Automatic sample submission.
A lot of customers are uncomfortable with the feature of Wi-Fi Sense, which is elaborated to get you onto wireless networks much faster. On a device with Wi-Fi, click the back arrow, choose Network & Internet, click Wi-Fi, and choose Manage Wi-Fi Settings. We’d strongly advise switching off Connect to suggested open hotspots, connect to networks shared by my contacts, and deactivating the button under Paid Wi-Fi services in case it’s available.
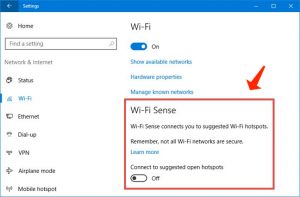
Furthermore, Wi-Fi Sense could result in the sharing of your network’s wireless login credentials among the appliances you don’t control and let a guest log in and their contacts – and quite likely theirs in turn – may also be able to. It’s funny that the only repair is to rename your network’s SSID so that it ends with “_optout”. We’d suggest confining guests to a guest wireless network, setting your own devices not to use Wi-Fi Sense, and asking the personnel to do the same before permitting their Windows 10 devices to work with the main wireless network.
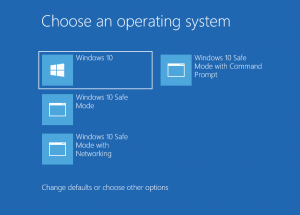
Where’s Safe Mode when you require it?
Safe Mode can be a life-saving remedy in many system-critical Windows 10 issues and their addressing, especially when your workstation considers it to be very complicated to start properly. Nevertheless, what if one happy sunny day, you reveal that you can no longer get into Safe Mode by pressing the F8 or Shift+F8 keys during the boot process? No matter how nervous this experience is, it’s important to stay calm. What you can consider doing is booting into Windows first, and then reboot the device by hitting the left Shift key. As an option, you can also do it by proceeding into Update & Security in Settings. Nevertheless, keep in mind that neither of these features will be of any aid in case your computer can’t boot into Windows at all.
This is why you need to consider establishing a boot time Safe Mode parameter as a precaution – this can be done by applying the Win+X hotkey, choosing Command Prompt (Admin), and then specifying bcdedit /copy {current} /d “Windows 10 Safe Mode” and confirming it by hitting the Enter key. Then, specify ‘msconfig’ into the Start Menu, launch System Configuration in the results, and proceed to the Boot tab. As soon as you locate your freshly-created Windows 10 Safe Mode feature, make it highlighted and tick the Safe Boot parameter, while also selecting the ‘Minimal’ under Boot type options. You can also select whether you’d need to lower the Timeout value to as little as three seconds, based on what will be the most convenient for you. Finally, tick the ‘Make all boot settings permanent’ parameter and click on OK. In case you ever want to remove the Safe Mode entry, you can do it simply by getting back here and removing it.
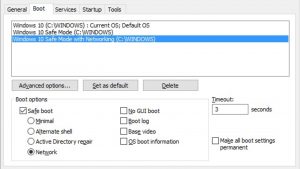
You can repeat these milestones, substituting suitable names in quotes at the Command Prompt, to generate shortcuts for Safe Mode with Networking (place a tick on Network rather than on Minimal in System Configuration) and Safe Mode with Command Prompt (Alternate shell).
Activate System Restore
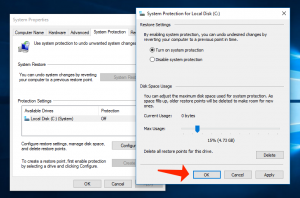
By default, System Restore isn’t active in Windows 10, we can’t come up with the conclusion why that is, it is such a helpful and crucial component everyone needs to have.
To switch it on, it must be activated manually via the Control Panel. Look for Create a restore point and choose the first result to launch the System Properties page. Under the “Protection Settings” area, choose the main “System” drive, then select “Configure”. Then choose the “Turn on system protection” parameter. Click the Apply button and then click on OK.
Once this is successfully accomplished, Windows 10 will always generate a restore point while implementing a new update or when particular system amendments are introduced.
Poor localization, Cortana ‘not available’
Windows 10’s localization features seem too complicated, and we’ve received numerous reports claiming improper localization even in PCs that were upgraded from properly localized Windows 7 or Windows 8 installations. The most typical issue seems to be system dates defined in the American format MM/DD/YY, however, Windows can also give a message that Cortana isn’t available, even in the areas where it is.
In the Start Menu, look for ‘region’ and select Region & Language preferences. Choose your main language, select Options, and click Download under the language pack, and speech options in case they’re available. Make sure on this page that the keyboard is also correct – in case it isn’t, add the correct one, then choose the wrong one and delete it.

Click the back arrow and choose Additional date, time & regional settings. Under Language, select Change input methods, choose your preferred language, move it to the upper part of the list in case it isn’t there already, and select Options. Under Windows display language you might encounter either Enabled or Available – in case with the latter, click Make this the primary language. In case you don’t see either, download and install the language pack and set it as the primary language.
Click the back arrow to get back to the language preferences, and in the left-hand pane select Change date, time, or number formats and make sure that the format is defined to the proper language. Be sure to check the Home location on the Location tab, and finally apply the Administrative tab to check the System locale and use the Copy settings button in order to apply the parameters to the Welcome screen and new user accounts.
Repair slow boot times
Just as Windows 8 before it, Windows 10 applies a hybrid boot in order to activate fast boot times. In times when you shut the system down, programs and app processes are terminated, however, the Windows kernel itself is hibernated to enable a faster reboot. Theoretically, it’s superb, however, it still is terribly slow for certain Windows 10 clients.
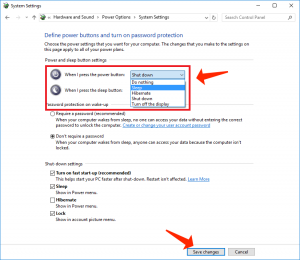
Deactivate it by looking for Power Options in the Start Menu and executing the matching Control Panel applet, then in the left-hand area click Choose what the power buttons do. Select Change settings that are presently unavailable, scroll down and uncheck Turn on fast start-up, then choose to Save changes. This should avoid a very slow start on affected workstations. Certain customers report that in case they subsequently reboot, repeat their steps and reactivate fast startup the windows 10 issue is finally fixed.
In case you’re dual booting between Windows 10 and Windows 7, turning fast startup off will also resolve the issue where Windows 7 examines the disks each time you boot it: With fast start-up activated, the earlier operating system fails to recognize that the disks have been duly shut down by Windows 10.
Getting distracted by the lock screen
Get to a locked Windows 10 device and you’ll encounter a pretty picture. That’s brilliant, however, it’s a useless obstacle in the process of logging in. In case you’re as annoyed as we are, deactivate the lock screen by going to the Start Menu for regedit, and launching the Registry editor.
Pay attention to this guide: How to Resolve the Most Annoying Issues in Windows 10
Proceed to HKEY_LOCAL_MACHINE\SOFTWARE\Policies\Microsoft\Windows. In case you don’t already found a key named ‘Personalisation’, choose the Windows key, right-click it, select New>Key and rename this fresh key to Personalisation (sic). Right-click the Personalisation key select New again then choose DWORD (32-bit) Value. Choose New Value #1 in the right-hand area and apply F2 to rename it NoLockScreen, then double-click it, amend the value data to 1 and click OK. Upon a reboot, the lock screen will disappear.
Failure to play a DVD
Windows 10 goes without a utility to play DVDs on. Which isn’t good in case you like to watch movies on your device.
The good thing is that Microsoft has launched an app as a download5. The problem is that its cost is 12.49 USD currently. It also has gathered a total rating of just two stars. Optionally, you can download VLC, which is free of charge and operates just as well if not better.
Prevent Windows 10 from using 4G data
Windows 10 often “eats” the resources of your Internet bandwidth secretly in the background which can play havoc with your data allowance in case you’re applying a portable hotspot.
To prevent Windows 10 from devouring your cellular data allowance in the background:
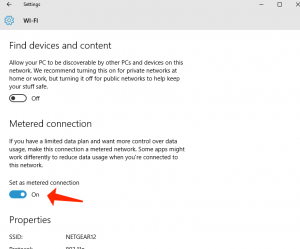
- Proceed to Settings, then Network & Internet.
- Choose Wi-Fi and then Advanced Options.
- Define “Set as metered connection” to on, and Windows will discontinue fetching non-crucial data in the background, for instance, app updates and Start screen tile updates.
Surprisingly, this recommendation doesn’t function in case your computer connects to the web via Ethernet.
Save an Internet page as an HTML file in Microsoft Edge
Crazily, Microsoft’s fresh Windows 10 Internet browser can’t now save web pages as an HTML file. The only solution is to display the web page in Internet Explorer 11 (which is still the part of the standard pack with Windows 10) and save it from there.
To make it possible:
- Choose the menu on the far right-hand part of the Edge window.
- Choose the open with Internet Explorer’ feature. This will reveal your current web page in a new tab in Internet Explorer.
- In Internet Explorer 11, apply the Control-S hotkey on your keyboard to get to the Save as dialogue box.

Switch on Pop-Up Blocker in Edge
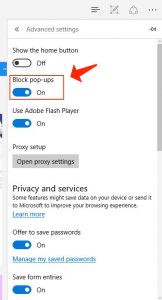
In case you used Microsoft Edge, you may reveal that pop-up advertisements will get in the way of the pages you actually would like to visit. You can deactivate pop-ups by clicking on the icon with three dots on the right-hand part of the address bar and then selecting “Settings”, then “View advanced settings”. In the “Block pop-ups” area make sure this is defined to “On”.
Files opening with the improper default apps
Windows 10 has a bad habit of reverting all the file associations back to default parameters in times when it updates. This implies that even in case you specifically define some types of files to open with specific apps, they may get back to the Windows defaults.
This isn’t ideal, especially considering the fact that the default Windows utilities for many tasks are inferior to third-party options. The good thing is that there’s a surprisingly easy repair for this, letting you restore your initially chosen associations.
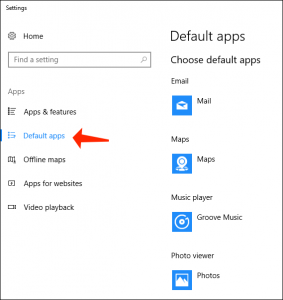
Go to the Windows 10’s Settings app, and under the System tab, you need to locate a category labelled ‘default apps’. At this point, you’ll be able to choose what kind of program opens various sorts of media. For instance, you amend it so that music is played in Windows Media Player instead of Groove Music.
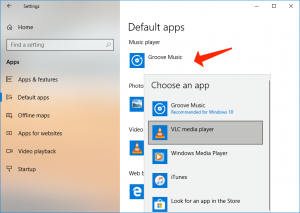
You can even narrow things down to the minor details, modifying which programs open certain file extensions. This implies that you can define various applications to open certain image or video files, for example, while still having the majority opened by a different utility.
References
- Microsoft Windows: https://en.wikipedia.org/wiki/Microsoft_Windows
- Desktop Operating System Market Share Worldwide: https://gs.statcounter.com/os-market-share/desktop/worldwide
- Download Windows 10: https://www.microsoft.com/en-us/software-download/windows10
- Microsoft Defender: https://en.wikipedia.org/wiki/Microsoft_Defender
- Windows DVD Player: https://www.microsoft.com/en-gb/store/apps/lettore-dvd-di-windows/9nblggh2j19w?tduid=(176cd019144419fc1d505eee9550a826)(266696)(1503186)(skim58537X1360486Xda161d8f7ec119d42fc19a24967c391b)()
Leave a Comment