
Windows 10 is excellent, however, it has got its problems too, starting with unexpected reloads and ending with everlasting alerts. This is how to resolve some of the most annoying troubles with Microsoft’s most recent operating system.
It’s quite possible that Windows 10 is the best version of Microsoft company. However, nobody has ever developed a totally ideal operating system. Even though we do like Windows 10, it definitely has got a lot of issues that are absolutely annoying.
The good thing is that a lot of such issues in windows 10 can be easily resolve. These are the milestones you can undertake, to make sure that 10 doesn’t keep getting on your nerves.
Disable Auto Reboots
Windows 10 updates are common and obviously never-ending, and pretty much out of the customer’s control (unless you switch off updates completely, which is a bad approach). However, worse things can be expected in case you don’t restart your workstation after an update, Windows 10 obviously takes it upon itself to reload itself for you. If so, there’s a good chance to lose information in open programs.
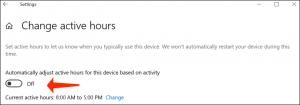
You may enjoy the feature known as Active Hours, which allows you to schedule a certain time for updates and reloads. Proceed to Settings > Update & Security > Windows Update > Change active hours. To choose your own time frame, click Change and amend a start and end time.
Beginning with the May 2019 Update (version 1903), meanwhile, you also have a chance to have Windows automatically modify active hours based on your device’s performance. Proceed to Settings > Update & Security > Windows Update > Change active hours and toggle on the parameter for Automatically adjust active hours for this device based on activity.
Deactivate Sticky Keys
In case you hit the Shift key five times in a row in Windows, you enable Sticky Keys, a Windows component that allows for keyboard shortcuts where you press one key at a time instead of simultaneously (this way it functions with any combo, such as the Shift, Ctrl, Alt, or Windows keys).
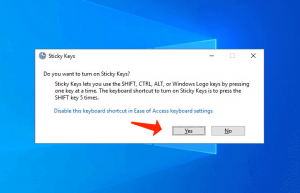
In case you activate it without knowing by hitting “yes” in a dialog box without understanding, for instance – it can be absolutely annoying. Stop this from ever taking place by pressing the Shift five consecutive times to reveal that very dialog box. Choose to Disable this keyboard shortcut in Ease of Access Keyboard Settings and uncheck the box close to Turn on Sticky Keys when SHIFT is pressed five times.
Calming the UAC Down
Starting with Windows Vista, User Account Control (UAC) has been there to defend customers so they can rapidly grant administrative privileges to software applications that require it – specifically while installing or uninstalling application. Previously, when you tried to perform an install, the screen would unexpectedly dim and it looked like everything comes to a halt, resulting in certain (anecdotal, most likely fake) heart attacks for some customers. UAC is still available in Windows and still dims the desktop occasionally, but you have the chance to switch it off, or at least deactivate the screen dimming.
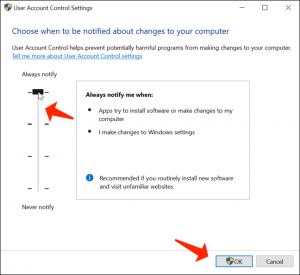
Specify UAC into the Windows 10 search field to go to the Change User Account Control Settings. The screen gives a slider with four levels of security, from never notify (bad) to always notify (it’s quite irritating that it’ll warn you when you make your own amendments). Pick one of the middle parameters; the second from the bottom informs you without the dimming scare tactic. With that feature active, you’ll still see a dialog box approval with a yes/no feature when you install things.
Get Rid Of Inactive Programs
Are you aware that you have an app in Windows 10 named Groove Music? Most likely not, because the majority uses other programs. The good thing is that a few pre-installed Windows programs can eventually be uninstalled. Proceed to Settings > Apps > Apps & Features, where you can trash Mail and Calendar, Groove Music, Weather, and Maps.
In case your uninstall feature is grayed out, you could go the DOS route, however, it can be a bit complex and you should be 100% confident of what you’re doing.
- Specify PowerShell in the Windows search box—when you encounter it, right-click and start it via Run as Administrator.
- Specify “Get-AppxPackage –AllUsers” without the quotes. A huge list of all the package you’ve got installed that came from Microsoft’s Store, plus some other apps, will be revealed.
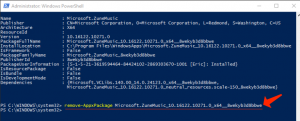
- It’s hard to locate those apps in there, but the last one will probably clearly mention Microsoft.ZuneMusic—that’s actually Groove Music. Copy everything it specifies on the line next to PackageFullName.
- You’ll then specify a command and paste that line, so it indicates something similar to “remove-AppxPackage Microsoft.ZuneMusic10.16122.10271.0x64__8wekyb3d8bbwe” (in your case it could vary after the first underscore character).
- Launch it with a stroke of the return key. In case you don’t encounter any problems, the Groove Music app should be deleted. Be careful while you apply this trick on other apps— make sure you’ve selected the correct one.
Pay attention to this guide: How to Enable Network Discovery and Configure Sharing Options in Windows 10
Apply a Local Account
Microsoft really would like you to sign in to Windows 10 with your Microsoft account — the one connected to all things Microsoft, whether it is in your Xbox, Office 365, or OneDrive account, purchasing apps or music or video in the Windows Store, even communicating on Skype, to mention just a few. Once you set up Windows, Microsoft cordially asks you to sign in via that account.
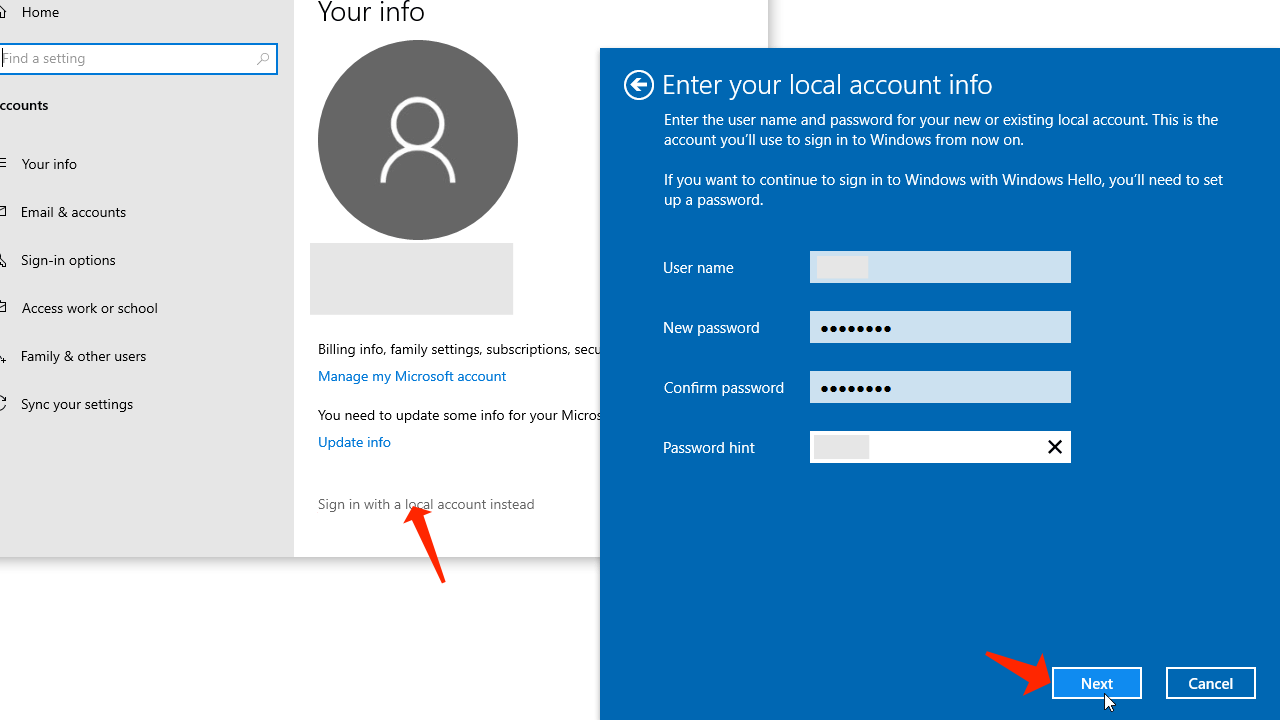
However, you have another option. During the installation, simply click Skip this step. In case you already logged in with the Microsoft account, proceed to Settings > Accounts > Your info. Click Sign in with a local account instead. Provide a local account name and new password (with a hint for when you don’t remember it).
The bad thing is that when you end up on a service or page that asks for Microsoft credentials, you’ll need to provide your Microsoft login each time; it won’t automatically log you in since it does if you log into Windows with a Microsoft account.
Set a PIN, Not a Password
In case it’s OK with you to use the Microsoft account but you hate how long it takes to specify in your super safe password, reset it to a short personal identification number (PIN) applied only on the computer. The PIN, which is only numerals—no mixed case letters or certain characters—might not sound safe. However, it’s PC-only, hopefully you’re the only customer, and it doesn’t compromise the safety of your Microsoft account anywhere else. Additionally, the PIN can be as many digits as you want.
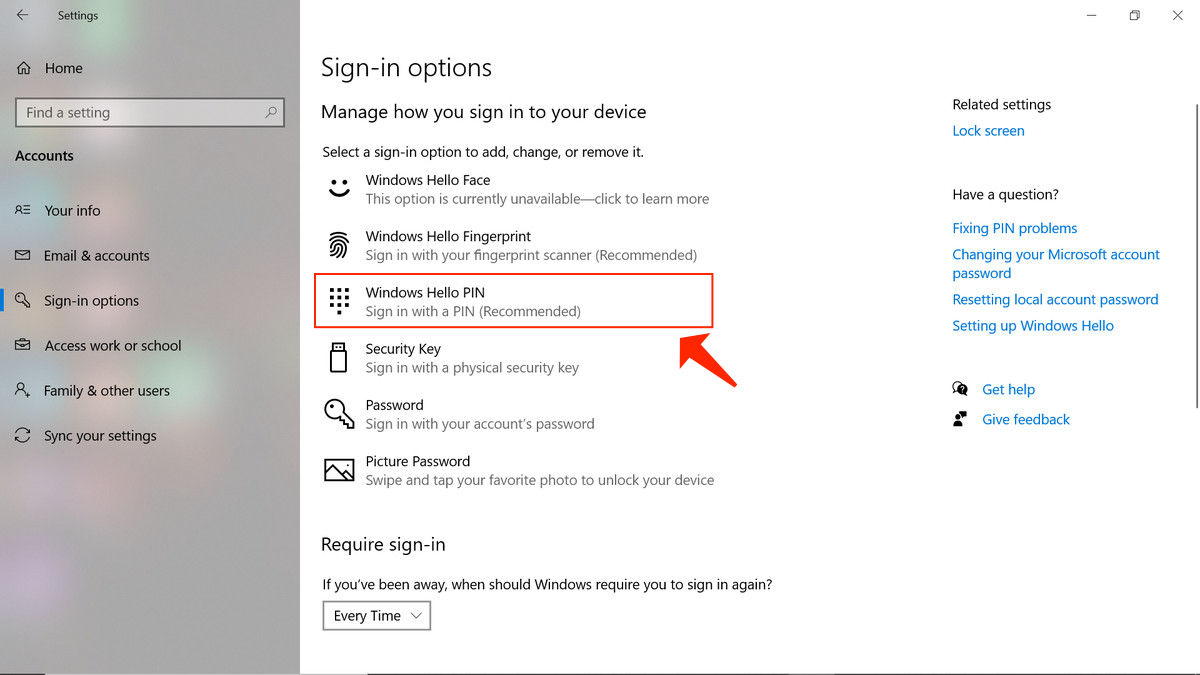
Proceed to Settings > Accounts > Sign-in options, and choose the Add button under PIN. Provide the PIN you prefer and reboot to try it. In case you’ve already got a PIN, you’ll encounter options to amend it, delete it, or click “I forgot my PIN” to restore it.
Remove the Password Login
Are you the only one who ever uses your PC? Are you confident in that? If so, you can obviously skip the password login screen that comes up after every restart or sometimes even when you get back from the screensaver mode.
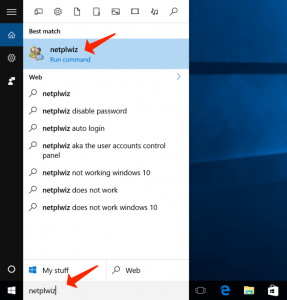
Proceed to the User Accounts control panel by indicating “netplwiz” in the search box. Choose the account, uncheck the box close to Users must enter a username and password to use this computer. You’ll see a confirmation box that tells you to provide that very password—twice. Click OK. Reload the computer, and it should roll smoothly into the Desktop without requiring a password. Don’t do this in case it’s a shared device. Keep in mind that you’ll still have to know the password in case you’re logging into the PC on a remote basis.
Refreshing Instead of Resetting
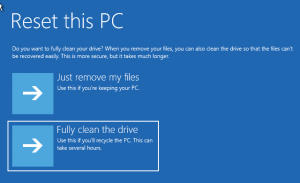
Windows 10 has got a brilliant component that lets you fully reinstall Windows 10 on your PC from the ground up, like new. It gives you the possibility not to remove any of your information (even though you will need to reinstall programs and drivers). In times your computer is beyond the chance to be fixed, you have a chance to access it at Settings > Update & Security > Recovery. Click Get Started in the Reset this PC feature, select features like “Keep My Files” or “Remove Everything”, and let it rip. You don’t require any specifically designated media, such as a copy of Windows 10 on a disc or USB flash drive.
On the other hand, that can be above measure. In certain cases, Windows simply needs a reset that does not destroy your programs and drivers. This is also quite simply to do, however, it does need a copy of Windows 10 on a specifically designated media. Don’t you have it? Grab it here1. Launch it and install the included ISO file onto a 4GB or larger USB drive to apply in the reset now and in all further cases. Or you can simply mount it as a virtual drive in Windows 10.
Consider this guide: How to Create a System Restore Point in Windows 10
Double-click the installation on that media/drive’s Setup feature, ask to download updates and inspect Keep personal files and apps when it comes up. After a few more prompts and expectations, your Windows 10 system will obtain the refresh it requires.
Hide or Deactivate Cortana
Master Chief would never allow this to occur. Windows 10 removed the switch to disable Cortana, Microsoft’s answer to Siri and Alexa. However, Cortana searches more than your PC; it searches the entire web. You can still switch her off, however.
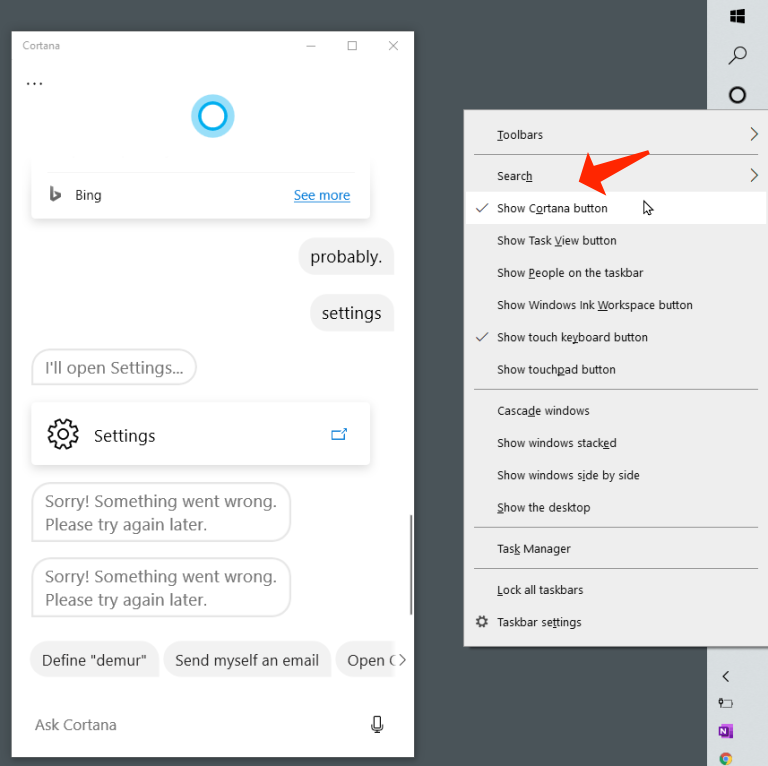
In the first place, there is the feature to hide Cortana: just right-click the Taskbar and choose Show Cortana Button. The Cortana halo ring is no longer displayed. She’s still ready and listens to you, however: tap the Windows key on your keyboard and begin typing.
In case you would like to really leave you alone, so all searches are local, you have to modify the registry. Don’t do this in times you’re not feeling like a Windows guru. Make a system restore point before you do it, to be on the safe side. This only refers to Windows 10 Home version.
Go to the Registry Editor: Type +R, then specify regedit and press Enter. In Windows 10 Home, proceed to HKEYLOCALMACHINE\SOFTWARE\Policies\Microsoft\Windows\Windows Search. In case it’s not available, generate it. Right-click it to form a DWORD value and name it AllowCortana. Define that value to 0 (zero). As soon as you log out and get back, the search box will now be titled as “Search Windows.” You can reactivate Cortana by doing all this again and defining the value to 1 (one).
Pay attention to this guide: Working with the File Explorer in Windows 10
In case you have Windows 10 Pro or Enterprise, you can refer to the help of the Group Policy Editor to switch her off, but for this purpose, you need to first ask your IT admin. Specify Windows Key+R, specify gpedit.msc to reveal the Group Policy Editor, then proceed to Computer Configuration > Administrative Templates > Windows Components > Search. Double-click on Allow Cortana, check the button next to Disabled. Shut down the window and reboot your Windows 10.
In case you’re deactivating Cortana for privacy issues, be sure to visit your Microsoft account2 online and remove everything Cortana gathered about you. Under Cortana’s Notebook, click the Clear Cortana Data button.
Put OneDrive to the Trash
Similar to Cortana, OneDrive—Microsoft’s answer to Dropbox or Google Drive—is introduced with the release of Windows 10. Firmly. Maybe too firmly. You can attempt to disregard it, however, it still often reminds you of itself.

The first measure to undertake: unlink it. Right-click the OneDrive cloud icon in the taskbar and choose Settings. Under the Account tab, select Unlink this PC. In case that’s not sufficient, in the Settings tab, uncheck all the boxes. Then get back to Account > Choose Folders, and uncheck all the data it was syncing. Proceed to Windows Explorer, right-click OneDrive and choose Properties; in the General tab, by Attributes, inspect the box close to Hidden. Then on the Taskbar, right-click OneDrive again and choose Close OneDrive.
Do you definitely need to remove OneDrive? Do it through the common App & features uninstall in Settings. You’ll locate it under “Microsoft OneDrive”.
Accessing Special Symbols Quick
Simply using 26 letters and 10 numerals and a few pieces of punctuation — that’s definitely so old-fashioned. We live in the emoji society today. Thus, how do you put those comic little icons into your text while typing in Windows 10? The pop-up keyboard. It’s commonly meant for application when Windows is in tablet mode, however, it’s simple to access even when you’re the customer of Windows with a common keyboard.
Right-click the Taskbar in a blank field, and choose Show touch keyboard button. An icon of a little keyboard will come up next to the clock in the taskbar. Tap it anytime with the mouse cursor to reveal the on-screen keyboard; tap any key on your IRL keyboard to get rid of it from the screen. Click the extra keyboard icon at the upper left area to obtain different layout options, such as a split keyboard and a stylus pad.
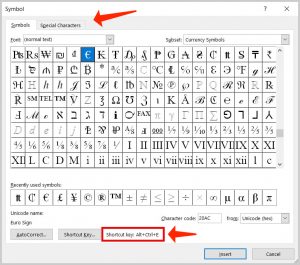
You now have access not only to emoji but also certain symbols, such as the em dash or degrees symbol (°). In case you can’t locate them, that means you first need to press the &123 key to get to symbols. Afterwards, like on a smartphone or a tab, hold down your cursor on the main key to obtain certain special symbols — hold down the hyphen to find em dash and en dash; hold down on equals (=) to find non-equals (≠) and so on. The same applies to the letters to obtain variations, such as accent symbols over the letters. That’s it!
Click the Smiley key to get access to the full range of common smartphone-style emoji, provided in Microsoft’s extra-colorful design, as shown above. You can scroll left/right to get even more in each category.
This on-screen keyboard also renders rapid access to the Windows 10 clipboard, which holds a lot of items you’ve cut or copied, and speech-to-text typing (or you can simply specify Windows Key+V to obtain the scrollable).
Disabling Notifications
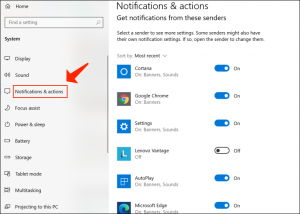
You either enjoy notifications or hate being distracted. The annoying sound, the popup, it’s too much when your smart phone is likely showing most of the same content. Proceed to Settings > System > Notifications & Actions. Switch off all the toggle switches for separate apps, especially the ones you believe are most annoying. Or click on the app name in the list for even more substantial control — get notifications out of one program on the lock screen, for instance, but nowhere else. Or switch off sounds except for one notifier. Play with the parameters to make them fit your choice.
Limit Your Diagnostics
Just as many other big-name corporations, Microsoft likes to obtain valid feedback regarding various things, such as crashes. However, when you perform a setup and Windows 10 asks to Send full error and diagnostic information to Microsoft, the company gets more than you expect. In Settings > Privacy > Diagnostics & Feedback, you can define things to defend certain privacy. Only permit Required diagnostic data, not Optional data; switch off the “Improve inking and typing” option; and even get rid of all the diagnostic data currently on your computer. However, that doesn’t prevent previous or future information from being granted to Microsoft.

Deactivate the Edge
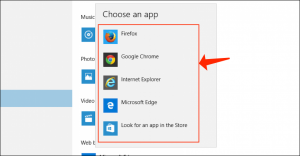
Don’t like Microsoft’s newest browser? However, no matter what browser you prefer, you need to set it as the default one, so anytime you open a link, it refers to the browser you want. Proceed to Settings > Apps > Default Apps, scroll down and select Web browser. A list will show all your installed browsers, so select your favorite one. You can always get back to whatever Microsoft considers best for you later by selecting the Reset button under Reset to Microsoft Recommended defaults.
In case you experience issues with certain links, be sure the file type (like .htm versus .html) or even protocols (like http:// versus https://) are all established to your browser of choice as well. Select Choose default apps by file type or Choose default apps by protocol on the same screen.
The majority of new browsers will attempt to take back the default position when you start them the first time, hence, in case you speed through a setup, you may have to revisit these preferences to get back to your initial, preferred Internet browser.
References
- Download Windows 10 Disc Image (ISO File): https://www.microsoft.com/en-us/software-download/windows10
- Microsoft account: https://account.microsoft.com/account/privacy
Leave a Comment