
With Windows 10, you have a chance of sharing files on your PC with other clients over the network. Even though this might seem pretty complex at the first glance, it’s really a simple challenge when applying the utilities the OS renders.
Based on your network environment and what you would like to do, there are approximately four solutions to establish file sharing on Windows 10. You can apply the Public folder, a certain setup that lets you share files over the local network without modifying permissions. Or you might want to share content by means of the File Sharing parameter on Windows 10. And in case you are searching for the solution to share files with other people across the web, you can refer to the help of file sharing with OneDrive.
With previous versions, you were also capable of using Homegroup, which contrary to the Public folder, automatically shared Windows 10 libraries folders (Pictures, Videos, Music, Documents), Printers, and other devices linked to your device. Nevertheless, it is no longer a component of Windows 10.
In this tutorial, you will find out about the solutions for sharing files over the network by means of the File Sharing1 and OneDrive on Windows 10. (Even though Homegroup is no longer present in the most recent version of Windows 10, the milestones to apply the feature will still be available, since it’s still a component in previous releases.)
Guide to share files by means of the File Explorer
Applying the integrated File Sharing component on Windows 10 is the best solution you can choose for sharing files in a local network, since it is more adjustable. You can apply more sophisticated permissions, plus you can share files with practically any device, such as Mac, Android, and Linux devices.
There are two solutions for sharing files with File Explorer. You can apply the common parameters, which let you share files on the network with minimal setup rapidly, or you can apply the advanced parameters for establishing custom permissions and establish other extended parameters.
Sharing files by means of the basic parameters
For sharing files on a local network by means of the express parameters, implement such steps:
- Start File Explorer2 on Windows 10.
- Proceed to the folder you would like to share.
- Right-click the folder, and choose the Properties feature.
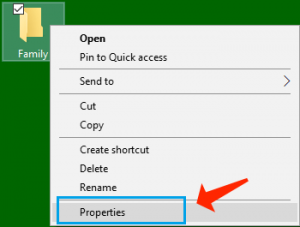
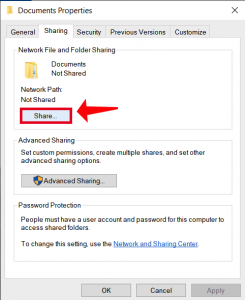
- Select the Sharing tab.
- Use the Share button.
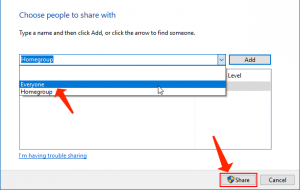
- Apply the drop-down menu to choose the user or group for sharing a file or folder. (For this tutorial, choose the Everyone group.)
- Use the Add button.
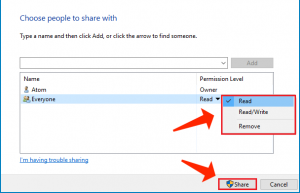
- Under the “Permission Level” area, choose the sharing permissions you would like the folder to have. For instance, you can choose Read (default) if you only would like people to view and open files. In case you choose Read/Write, people can view, open, amend, and get rid of the content on the folder you want to share.
- Choose the Share button.
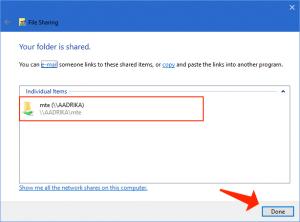
- Confirm the folder’s network path that other customers will have to access the network data and use the Done button.
- Click on the Close button.
Pay attention to this guide: How do I remove Advanced Windows Manager?
Sharing files by means of the advanced parameters
For sharing files on a local network by means of the advanced sharing preferences, implement these steps:
- Start File Explorer.
- Proceed to the folder you would like to share.
- Right-click the folder, and choose the Properties option.
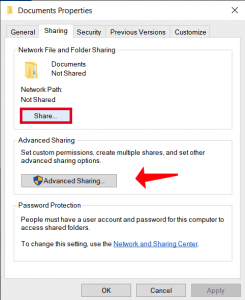
- Choose the Sharing tab.
- Select the Advanced Sharing button.
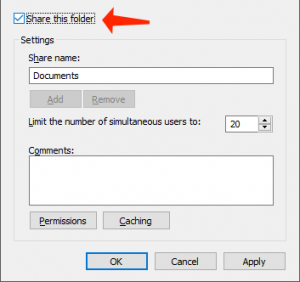
- Inspect the Share this folder option.
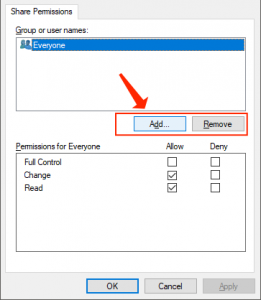
- Windows 10, by default, grants other customers with read-only access to the data you want to share, which implies that they can only view files, but they can’t perform any other actions. In case you would like customers to modify the files, remove, and form new documents in the location, you will have to click the Permissions button.
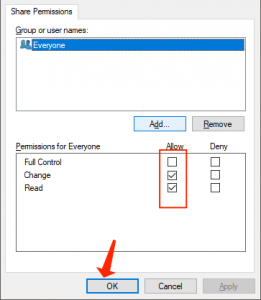
- Once you’re in the “Permissions” window, you will see that the “Everyone” group is the default feature highlighted. In the area below, you can set up the permissions for a certain person or group. In case you want people to open, modify, remove, and create files, then be sure to examine the Read and Change permissions under the “Allow” section.
- Choose the Apply button.
- Don’t forget to click on the OK button.
- Again, click the OK button.
Sharing files with a certain client
In case you only would like to share files with only a certain person, you can refer to the same steps, however, on step 8, implement these guidelines:
- Choose the Everyone group and select the Remove option.
- Apply the Add button.
- Specify the name of the user you would like to share the data with.
- Use the Check Name button.
- Choose OK button.
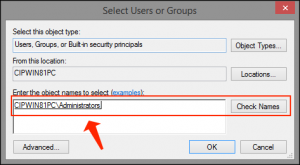
- Choose the user account, and you will see that the “Read” permission is selected by default. In case you would like the person to be capable of modifying, removing, and creating new files, be sure also to inspect the Change permission parameter.
- Choose the Apply button, then click “OK”.
As soon as you implement the above-said steps, the shared data will be available while surfing the remote PC on File Explorer > Network.
Consider this guide: How to Create a System Restore Point in Windows 10
Guide to share files over the network without password
With Windows 10, any file you share is by default protected by a username and password. This implies only people who have an account and password on the PC can access shared data.
In case you’re establishing file sharing on a local network for your family members or customers you know, it is possible to deactivate the requirement to sign-in with Windows credentials to let them access files on the sharing PC without a password required.
To deactivate password protection for file sharing on Windows 10, implement these steps:
- Go to Control Panel.
- Choose Network and Internet.
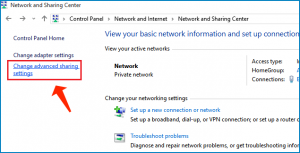
- Proceed to the Network and Sharing Center.
- On the left pane, use the Change advanced sharing settings link.
- Reveal the All Networks tab.
- Under the “Password protected sharing” area, choose the Turn off password protected sharing feature.
- Use the Save changes button.
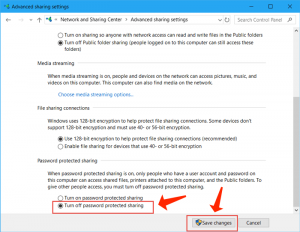
Once you implement the steps, users should be capable of accessing the shared folder without a password.
Instructions to share files via the Homegroup (deprecated)
Microsoft initiated Homegroup to be a simple to use solution for non-technical customers to safely share data between PCs running Windows 7 and later versions of the OS logged to the same local network.
Normally, home users are those who will use Homegroup, since it renders a straightforward and simple solution for sharing data, however, this solution has limited features. For instance, you have a chance of sharing your libraries (Pictures, Videos, Music, Documents), folders, printers, and other devices connected to your device. Nevertheless, you can’t share data with versions of Windows older than Windows 7 or other PCs running a different OS, such as Android and iOS.
Establishing a Homegroup
To make a Homegroup on a local network, implement these steps:
- Go to the Control Panel.
- Select Network and Internet.
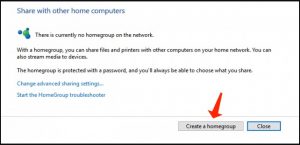
- Choose Homegroup.
- Use the Create a homegroup button.
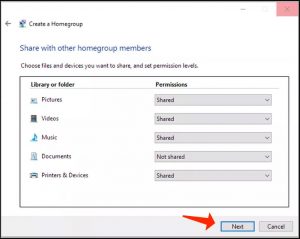
- Click on Next.
- Apply the drop-down menu to choose which folders and data (Pictures, Videos, Music, Documents, Printer & Devices) you would like to share. In case you don’t need to share an item, be sure to choose the Not Shared option.
- Click the Next button.
- Don’t forget to write down the Homegroup password since it will be required to join other PC, and click Finish to finalize the task.

Once you finalize the task, the Homegroup preferences page will be updated, showing the libraries you are now sharing and extra preferences, such as the ability to leave the Homegroup and modify the data you are sharing.
How to join a Homegroup
Implement these steps to join another PC to the Homegroup to access the data you are sharing on your workstation:
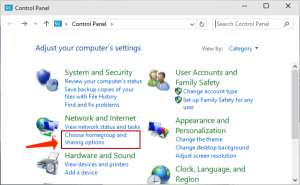
- Launch Control Panel.
- Choose Network and Internet.
- Use Choose homegroup and sharing options link.
- Click on Join now.
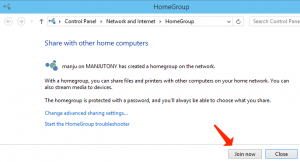
- Proceed with the on-screen guidelines to finalize the setup procedure.
In case you don’t find the Join now button, choose the Start the Homegroup troubleshooter option, which will introduce a rescan of the network and make the feature available.
Pay attention to this guide: Hide the Virus and Threat Protection Area in Windows 10
Sharing file on a Homegroup
As soon as you have a Homegroup created, your computer is already sharing those data and folders within the libraries you shared during the setup procedure. Nevertheless, in case you want to share data on a different location with customers connected to the Homegroup, implement the below-given steps.
Refer to these steps to initiate sharing data via the Homegroup:
- Launch File Explorer.
- Proceed to the data you would like to share.
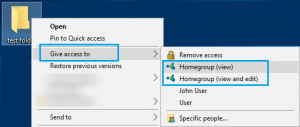
- Right-click the folder you would like to share and choose the Give access to parameter.
- You will encounter certain sharing features in the submenu, such as Homegroup (view) and Homegroup (view and modify). In case you only would like users to read permissions to your data, choose the Homegroup (view) option. In case you would like users to have read and write rights (which also lets them remove and generate files and folders), choose the Homegroup (view and edit) feature.
If you would like to stop sharing a folder you shared before, right-click the folder, choose the Give access to feature, and choose the Remove access parameter. As soon as you finalize the steps, the shared data should be available while browsing the remote PC from File Explorer > Homegroup.
Instructions to share data via OneDrive
You can also share data with other users across a network or around the world with the help of OneDrive4.
To share data via OneDrive on Windows 10, implement these steps:
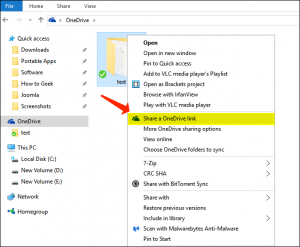
- Launch your OneDrive folder on Windows 10.
- Proceed to the folder you would like to share.
- Right-click the folder and choose the Share feature.
- Indicate the email for the customer you would like to share the data with. (Or the available features to copy the link or share data via other apps.
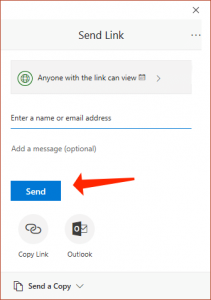
- Click on the Send button.
Any person who gets your notice will be capable of clicking the link and reading the folder’s content through any web browser.
How to share OneDrive files from the web
In case you would like certain people to view and modify the data inside of an OneDrive folder, you’ll have to share the folder by means of OneDrive on the web.
For sharing OneDrive data from the web, implement these steps:
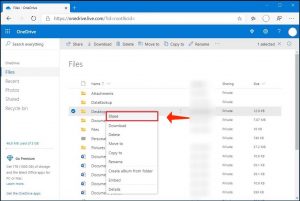
- Launch OneDrive online.
- Proceed to the file or folder you would like to share.
- Right-click the item and choose the Share feature.
- Indicate the email for the user you would to share the data with. (Or the available features to copy the link.)
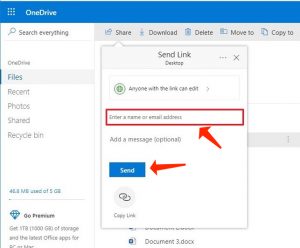
- Click on Send.

Consider reading: Parental Controls in Windows 10. Guide to Establish.
As soon as you implement the above-said steps, anyone with the link can view and modify the data or the content inside of the folder.
In case you only would like to share data with specific persons in a private mode, you may choose the feature to share via email.
Data you share will only be available to persons as long as your PC is switched on, except for the OneDrive sharing solution. Nevertheless, with OneDrive, people must have an Internet connection to gain access to the shared data.
References
- File Sharing: https://en.wikipedia.org/wiki/File_sharing
- File Explorer: https://en.wikipedia.org/wiki/File_Explorer
- HomeGroup removed from Windows 10 (Version 1803): http://support.microsoft.com/en-us/windows/homegroup-removed-from-windows-10-version-1803-07ca5db1-7bca-4d11-68a3-a31ff4a09979
- OneDrive: https://en.wikipedia.org/wiki/Microsoft_OneDrive
Leave a Comment