
The Virus & Threat Protection area is one of the seven components of the Windows Defender Security Center. It tracks threats and performs scans on your workstation to maintain your device safe. It also obtains updates in order to identify the latest threats on your computer. Customers can also perform various kinds of scans and inspect the results of their past virus and threat scans. Nevertheless, the Virus and Threat Protection components can be concealed from the customers. With the administrator’s rights, you can hide this area on a system used by multiple customers. In this tutorial, we will give you solutions through which you can simply hide the Virus and Threat Protection area in Windows 101.
READ ALSO: How to manage Active Hours in Windows 10.
The Local Group Policy Editor solution can only be applied on Windows 10 Pro, Windows 10 Education, and Windows 10 Enterprise. In case you are using the Windows 10 Home version, then consider implementing the Registry Editor solution. That is due to the fact that the Group Policy Editor isn’t part of the Windows Home edition.
Solution 1: Application of the Local Group Policy Editor
The Group Policy stands for a Windows component that has got all kinds of preferences for the OS. Most of the parameters that aren’t present in the Settings app and Control Panel can be located in Group Policy Editor. It provides you with all the settings for the Windows Defender Security Center. You can conceal the Virus and Threat Protection area by applying one of the settings in Group Policy Editor. Refer to the below recommendations to amend the values:
This parameter is applicable for at least Windows Server 2016 and Windows 10 Version 1709.
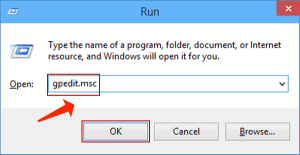
- Use the Windows key and hit R to reveal a Run dialog. Specify “gpedit.msc” in the box and hit the Enter to launch the Local Group Policy Editor.
- At this point, proceed to the following location in the Local Group Policy Editor. Computer Configuration\Administrative Templates\Windows Components\Windows Security\Virus and threat protection\
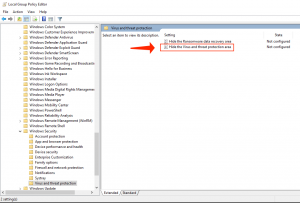
- Double-click on the parameter titled “Hide the Virus and threat protection area” and that will come up in another window. Now you must amend the toggle parameter from Not Configured to Enabled.
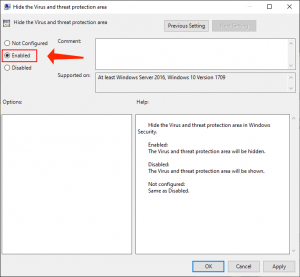
- Choose Apply and Ok buttons to save the amendments. Generally, the group policy will automatically update the new parameters.
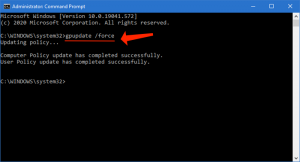
- Nevertheless, in case it does not get updated automatically, then you have to force update it. Look for CMD in the Windows search feature and launch it as an administrator.
- Specify the following command in CMD (Admin) window and hit Enter.gpupdate /force
- You may always enable the Virus and Threat Protection area again by modifying the toggle parameter to Not Configured or Disabled in step 3.
Pay attention to this guide: Your virus and threat protection is managed by your organization
Solution 2: Applying the Registry Editor
Another solution to conceal the Virus and Threat Protection area is by referring to the help of the Registry Editor2. This tunes up the same parameter as the Group Policy Editor solution. In case you already tried the Local Group Policy Editor solution, then your keys and parameter will be automatically updated for that exact setting. Nevertheless, in case you are defining it directly, then you have to generate the absent key and value for it. For Windows 10 Home clients, this is the only possible option to hide the Virus and Threat Protection area. This is a bit technical solution, so be careful to follow the below-given recommendations:
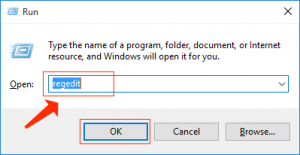
- Apply the Windows + R hotkey to launch a Run dialog box. Then, specify “regedit” and hit the Enter key to launch the Registry Editor. In case it was prompted by the UAC (User Account Control) dialog, click on the Yes button.
- You can also generate a Registry backup before implementing any new amendments. Click on the File menu and then select the Export mode. Then, name the file and choose the location for it. Choose the Save button to save it.
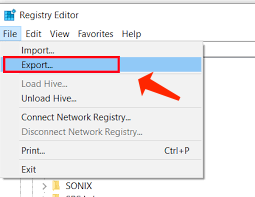
Note:You can restore a backup by clicking on the File > Import option and then choosing the file that you initially generated. - You have to proceed to the following path in the Registry Editor window: HKEY_LOCAL_MACHINE\SOFTWARE\Policies\Microsoft\Windows Defender Security Center\Virus and threat protectionNote:In case certain keys are absent, you can generate them by right-clicking on the appropriate key and selecting the New > Key feature.
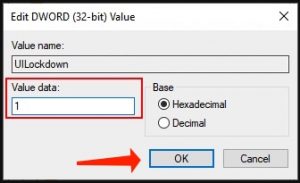
- Right-click on the right pane of the Virus and threat protection key and then select the New > DWORD (32-bit) Value parameter. Then, nominate the key as “UILockdown“.

- Double-click on the recently created value in order to open it. Then, amend the value data to 1.
- At the end, upon implementation of all the amendments, be sure you reboot your PC to apply these amendments.
- You may always enable the Virus and Threat Protection area by amending the value data to 0. You may also just remove the recently generated value from the Registry Editor to reactivate it.
Consider reading: Boost your Windows 10 PC: 20 Working Solutions.
References
- Virus and threat protection: https://docs.microsoft.com/en-us/windows/security/threat-protection/windows-defender-security-center/wdsc-virus-threat-protection
- Windows Registry: https://en.wikipedia.org/wiki/Windows_Registry
Leave a Comment