
Windows search not functioning or down: A trouble that can be simply repaired
The increasing number of customers claim about Windows search not functioning recently. The search in Start Menu is a thing that all Windows 7/8/10 customers apply in common tasks using the PC. An unexpected failure of this beneficial functionality can be a headache. You can no longer locate applications, documents, or in the worst case, control panel to start a troubleshooter. Nevertheless, the trouble can be resolved quite rapidly, and there is no requirement to apply any costly apps for that purpose. The tutorial set forth below also has got a 2020 Update for troubled Bing search that took place after Windows update.In case Windows Start Menu Search gives no results and is displayed as blank while you specify entries in the search bar, then it is a good idea to undertake the measures right away. Even though in some instances rebooting the PC might resolve the issue, the trouble can be more consecrated in the system or be associated with the Windows Updates from Microsoft, for instance, the interconnection with Bing search in 2020. In reality, search issues are as typical as Windows sound issues, hence, there is no need to panic.
To activate the search in Windows 10, you have to inspect certain services and parameters on your PC. We have elaborated on a step-by-step tutorial on how to repair Windows 10 Search not functioning. The solutions you can apply are set forth below.
Steps to Repair Windows Search Not Working
Step 1. Repair Windows search that displays blank results (Updated in 2020)
Starting from February 5th, many Windows 10 customers around the world found out that Windows search displays blank results after providing a search query. This issue came up as a result of a Bing interconnection to Windows search functionality. Currently, there is nothing you can undertake to force the Bing service function in a proper manner since the problem rests on Microsoft’s part. Nevertheless, you can deactivate it and keep applying the Windows search solely. The safest solution to do it is to amend the Registry personally. We strongly not advise downloading pre-made remedies since these can be labeled as hazardous by your security software.Guide to Deactivate Bing Search integration
- Use Windows key + R on your keyboard simultaneously. This starts the Run prompt.
- In Run prompt, specify regedit and hit OK.
- At this point, you will encounter the User Account Control window on your screen, which interrogates whether you would like to let the application introduce amendments to your system. Select Yes.
- At this point, apply the left navigation pane to start folders in the following sequence:
HKEY_CURRENT_USER\Software\Microsoft\Windows\CurrentVersion\Search. Alternatively, you could simply copy and paste this string in the navigation bar in Windows Registry. - Then, right-click on Search folder, and choose New > DWORD (32-bit) Value.
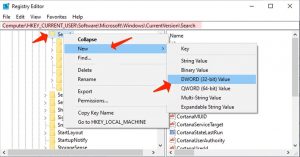
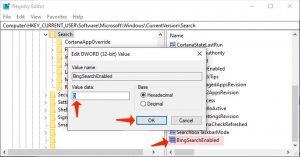
- Then, name the generated DWORD Value as BingSearchEnabled.
- Double-click it to make sure it has got a value of 0. In case you’re not familiar with technical definitions, 0 stands for negative (false) and 1 stands for positive (true) value in IT. This is the reason why BingSearchEnabled with value 0 implies it is currently disabled.
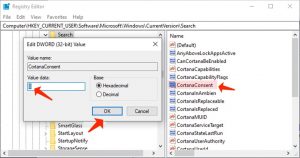
- Then, in the same Search folder, locate a key called CortanaConsent. Double-click it and define its value to 0. Click OK for confirmation.
- Close the Registry and reboot your device for amendments to take effect. Your Windows search must be back to the regular settings and no longer display blank results.
Step 2. Reload Search services with the help of a Task Manager
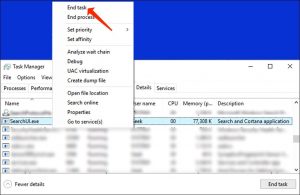
One of the simplest solutions to activate search in Windows is to reload Search and Cortana features by means of the Windows Task Manager.- Start Windows Task Manager by hitting the Ctrl+Alt+Del. If needed, click Task Manager. At this point, proceed to the Details tab.
- At this point, locate SearchUI.exe process. Right-click on it and choose End Task. This will immediately reboot the Search and Cortana tool. Inspect whether the issue was fixed by providing something in Start Menu Search.
Step 3. Reboot Windows search functionality
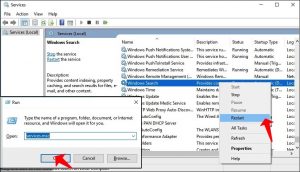
You can reboot Windows search service by means of the Services panel.- Start Run prompt by hitting the Windows key + R. Specify services.msc and press Enter.
- Located a process named Windows Search. Right-click it and select Restart. Attempt to apply the search at this point.
- Optional. Once you right-click on the process, you may also proceed to Properties and define the Startup method to Automatic. Remember to click Apply and OK for confirmation of the changes.
Step 4. Reboot Windows Explorer and Cortana
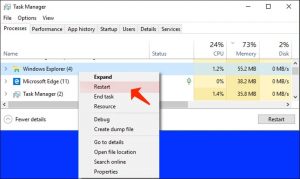
If the previous solutions didn’t fix the trouble with Windows search, you should attempt to reboot Windows Explorer and Cortana.- Start Windows Task Manager by hitting Ctrl + Alt + Del and choose Task Manager. Alternatively, you can just click Ctrl + Shift + Esc.
- In the Processes tab, locate one named Windows Explorer. Right-click it to start a quick menu and choose Restart. At this point, locate a process named Cortana and implement the same thing with it. Inspect whether the Windows search not functioning issue is now repaired.
Step 5. Use Windows Troubleshooter
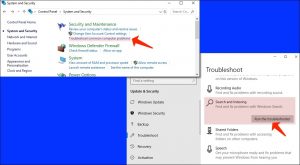
Windows Troubleshooter can assist you in restoring indexing services. Furthermore, troubleshooters are helpful because they perform the hard part of the work for you – you simply have to launch them and take time for guidelines.- Considering the fact that you cannot apply the Windows search and the ‘results’ section is still blank as you specify some queries, you will have to start Control Panel by means of the Run prompt. Hit Windows key + R, specify control panel and press Enter.
- Proceed to Troubleshooting > System and Security. The next step is to click Troubleshoot common computer problems. A new window should come up. Then, locate the Search and Indexing option and choose it, the next step is to select the Run the Troubleshooter button.
- The troubleshooter should itself suggest starting it as Administrator during the procedure. Give your consent to do so.
- Apply the implied repairs.
- Inspect whether the “search bar doesn’t work Windows 10” issue still remains.
Step 6. Set up the volume of the paging file
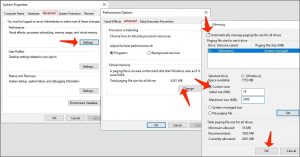
- Hit Windows key + R on your keyboard. Specify sysdm.cpl and select Enter.
- Proceed to the Advanced tab, then select Settings… in the Performance area. Search for Virtual memory area and select Change… button here.
- Place a tick in the checkbox that indicates Automatically manage paging file size for all drives.
- Select the Custom size and provide 16 for Initial size and 2000 for the Maximum size. Select OK for confirmation.
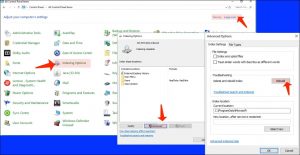
Step 7. Checking Indexing Parameters
Yet another solution to repair Windows 10 search that keeps loading is to insignificantly amend the Indexing Options.- Hit two buttons simultaneously: Windows key + R. Then, specify control panel and press Enter.
- In Control Panel, define View by to Large icons. Now search for Indexing Options and start it.
- Select Advanced and Rebuild in Troubleshooting. Click OK for confirmation. It is now clear that you can also get a Windows search troubleshooter in this area if you would like to give it a try.
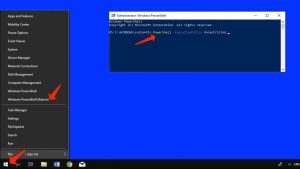
Step 8. Apply the Powershell commands
You may attempt to launch several commands by means of the Powershell to repair the trouble. Simply copy and paste them.- Right-click on the Windows logo in the taskbar. Select Windows Powershell (Admin). Choose Yes in UAC window.
- Provide the below-stated line and hit Enter: PowerShell -ExecutionPolicy Unrestricted
- The next step is to copy and paste then the second command and hit Enter:
$manifest = (Get-AppxPackage Microsoft.WindowsStore).InstallLocation + ‘\AppxManifest.xml’ ; Add-AppxPackage -DisableDevelopmentMode -Register $manifest - Reboot your PC and inspect whether the issue was fixed.
Step 9. Launch CTFMON process
Ctfmon.exe stands for a process related to the Windows Alternative User Input and Office language bar. Launching this process might fix the search issue in Windows, so consider using it:- Hit Windows + R to reveal Run.
- Paste the below-said line into it and hit OK:
C:\Windows\System32\ctfmon.exe
In case you are aware of any other ways to fix this issue, feel free to share your experience with our readers.
Leave a Comment