
Purpose of Google Public DNS.
As may you already be aware of, the DNS server has the purpose of matching Internet names and IP addresses. At times you indicate the website name, you are forwarded to the intended address. Each ISP has got its own designated name server. What are the privileges of Google’s DNS servers?“Having outages in the Caledonia, Michigan area, the spectrum website keeps giving 500 and 404 errors when trying to login, and the spectrum DNS servers are down.”, — writes Twitter user @KarlBlessing.
What are the privileges?
1. Trust in the correct resolution of Internet names
When applying the Google DNS, you actually have a warranty that when you provide the website address you will encounter the original, instead of a substitute resource.
2. The rapidity of updating Google DNS databases
It sometimes occurs that the website amends IP. This may happen because of moving to another hosting resource or other technical details. On Google’s servers, such data is updated quickly, almost right away, whereas other servers, when asked for a hostname, can still provide an outdated IP address for a great duration of time (at least a couple of days).
3. Prevent blocking website provider
In case your Internet Service Provider blocks a certain resource via the DNS service by means of matching the domain name with another IP address (for instance, 127.0.0.1), with the help of registering Google DNS servers, you can eventually reach the blocked resource. In this manner, for instance, Turkey is blocking the Wikipedia site.
You have a range of options for applying Google’s public DNS:
- on another device. In this instance, the privileges will be solely on this workstation.
- on the router. Simultaneously, all appliances on the network will refer to the trouble-free DNS servers based on the default settings.
Guide to register DNS 8.8.8.8 (8.8.4.4) on a PC.
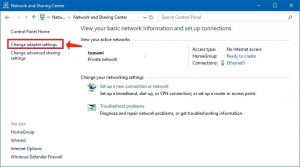
If you would like to apply Google DNS on your device, implement these guidelines:- Right-click on the network icon in the taskbar and start the “Network and Sharing Center”:
- Select “Change Adapter Settings“:
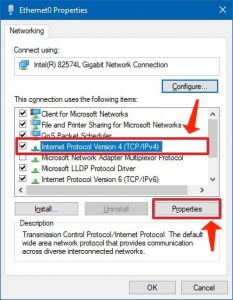
- Highlight “IP version 4 (TCP/IPv4)” in the list.
- Check “Properties”:
- Define the switch to “Use the following DNS server addresses“:
- In the Preferred DNS server area, specify “8.8.8.8“.
- In the Alternative section, optionally, provide “8.8.4.4“.
- Select “OK”:
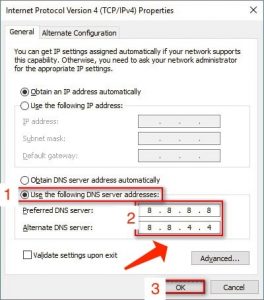
- To save all the performed amendments, click “OK” – “OK” – “Close”.
Guide to register 8.8.8.8 on a router.
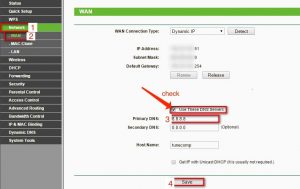
The most proper solution is to define 8.8.8.8 and 8.8.4.4 in the parameters for getting connected to the provider, in other words, in the WAN parameters.Setting Google DNS in TP-Link Routers
- Start the Network section.
- Choose the WAN area.
- Specify 8.8.8.8 in the Primary DNS area.
- You can define 8.8.4.4 in the Secondary area.
- Apply the Save button:
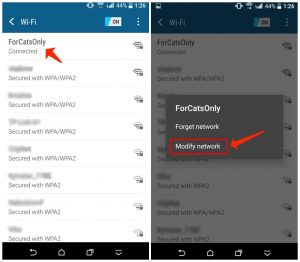
Google DNS network parameters on Android
- Proceed to “Settings”
- Press and hold on the name of your network
- Tap on Modify network
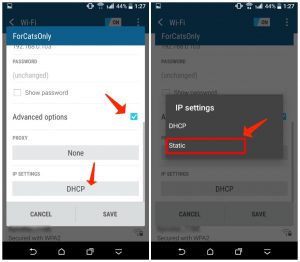
- Inspect the section “Advanced options”
- In the IP settings, choose Static:
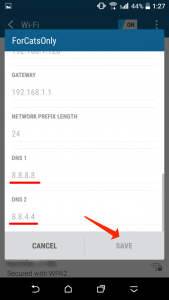
- Define Google DNS 8.8.8.8 and 8.8.4.4 as DNS1 and DNS2 accordingly (you can fill in only the DNS1 area and leave the second area empty).
- Click “Save” to confirm the amendments to the network settings of your Android device:
The remedy is to apply a third-party tool. You have to select between some third-party applications in the Google Play Store (Google doesn’t have such a tool). Such tools would sometimes attempt to convince you to perform purchases, and until you perform the payment, they display advertisements. However, you can apply them to actually amend your mobile connection to transmit information to Google DNS. Consider using some of them and select the one you prefer.
Keep in mind that such tools function just like any VPN software. You can manually get connected and disconnected to the VPN to launch or terminate it by means of 8.8.8.8, accordingly, or make it connect by default at startup or in times when you choose to restart the system.
Leave a Comment