
UEFI is a computer firmware that is essential for your PC. It launches automatically each time we boot into our operating system, but not all users know how to enter it manually. Why can it be needed? Dozens of purposes, which, however, are pretty rare for the common user. But still, everyone can one time need to enter the UEFI.
What is UEFI?
Unified Extensible Firmware Interface, or shortly UEFI, is the basic firmware of your motherboard. It is present even if you have no OS installed on your PC. It offers basic functions, which are needed to install the operating system, adjust CPU clock rate, change the system time, check the computer hardware properties and so on. Most of the UEFIs (they are different from one motherboard manufacturer to another) offer a graphic interface.
Earlier, BIOS (basic input-output system) was playing the role of the Unified EFI1. It was invented long ago, at the start of the computer epoch. Its functions were enough by that time, but it was hard to make BIOS compatible with different boot devices, as well as dual-boot setups. For example, most BIOSs were struggling to boot from USB devices. Setting up a dual-boot system on it was just a nightmare, and it was very easy to lose your boot record because of the firmware bugs.
Users who have already dealt with computers in the ‘90s and ‘00s still call the basic firmware “BIOS”, regardless of the fact that the exact PC may already be using UEFI. This name became a common noun, just like Kevlar for aramid fiber and Pampers for diapers.
Why may UEFI be needed?
For basic computer usage, access to UEFI is not very crucial. Most of the users do not even know how to enter UEFI settings. The most used purpose of this firmware (besides installing the OS) – adjusting the CPU and RAM clock rates/timings – is rarely used nowadays. However, some other critical functions – like managing the boot records, switching the peripheral devices’ modes, and changing the minor hardware properties – are still in need. Moreover, they sometimes are needed after the malware removal process.
Some laptops offer the ability to enable or disable the keyboard backlights, set the mode of functional keys (F1-F12) and always-on USB ports. Desktop motherboards also offer similar things, as well as speeding up the boot process with disabling the POST check.
Nonetheless, not each UEFI may offer you such functionality. Different motherboard manufacturers install different versions of firmware, and they may differ significantly. For example, ASUS almost always offers a full-featured graphical interface with mouse pointer support. Acer, on the other hand, offers only a minimalistic UEFI with the controls on arrow buttons. That is pretty similar to BIOS, which does not support the mouse at all. Dell offers different variants of the Unified EFI – both with GUI and without one.
How to access the Unified EFI?
Just like with the exact UEFI look, the access to it is dictated by the manufacturer. However, there is also a way to enter the firmware setup through the Windows interface. Let’s check both methods.
Enter the firmware setup on the boot
Each manufacturer binds the default key on the keyboard to access the firmware. Usually, it is Del, Esc, or one of the F1-F12 keys. Possibly, there are two keys or key combinations which will call the firmware screen. Oftentimes you may notice the instructions for UEFI loading exactly at the loading screen. It is hard to mention the key for each company, so I will describe the ones only for the most popular motherboard producers.
Press these key(s) when booting your computer. To avoid missing the moment, you may just constantly press it the whole time after pressing the Power button.
| Motherboard manufacturer | Key to enter UEFI |
| Dell | F2 |
| Acer | Ctrl+Shift+Esc, F1, F2, Del |
| ASUS | F2, Del |
| Gigabyte | Del, F8 |
| MSI | Del, F9 |
| ASRock | F2 |
| Biostar | F12 |
| Intel | F2 |
Going into UEFI through Windows
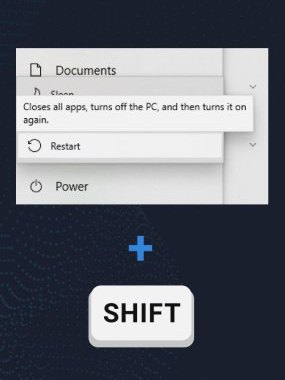
Since patch 20H2, Windows 10 is capable of rebooting directly into the firmware interface. The function was realized through the Troubleshooting mode that appeared in 2017. To boot your device into the Troubleshooting mode, go to the Start menu → Power, and press the Reboot button while holding the Shift key.
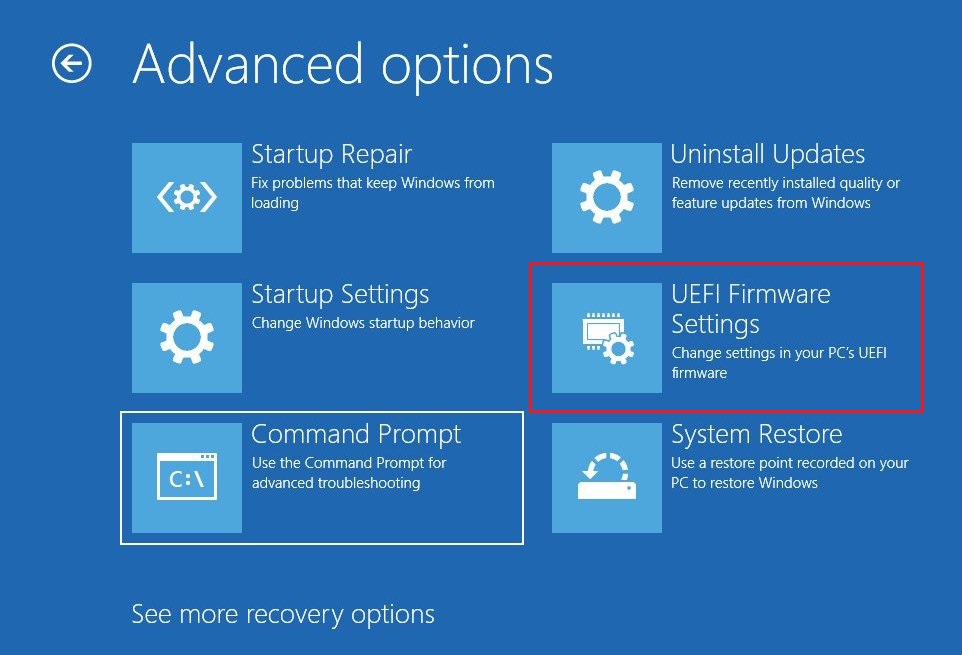
Your system will reboot then into a Troubleshooting mode. It allows you to choose between different settings, but what you need is Advanced setups → UEFI Firmware settings. Your computer will ask you if you are sure to boot into firmware. Accept it and you will see your firmware settings screen.
References
- More information at what the BIOS is.
Leave a Comment