When we talk of parents, there is nothing more crucial than their kids, and there is no wish greater than the wish to defend their children from everything that can hurt them and in every realm – especially the realm of the world wide web. The web can be a frustrating place, specifically for naive and unwary young visitors. This is why it is essential for all parents to undertake the measures and defend their children from the dark sections of the web as best as it can be. Microsoft is aware of this fact and understands its importance, that’s why Microsoft launched a range of various parental controls with Windows 7 which were elaborated to assist parents in making the web a safer place for their children.
At the lapse of some time and with new releases of the Windows Operating System, the parental controls that Microsoft launched with Windows 7 have been amended a little bit and were formalized to become more effective. A considerably more refined and working array of parental controls have been launched to the world with Windows 10, however, while such parental controls may be better, they are a little bit different, which can make it harder for parents who are new to parental controls to grasp and properly tune up Windows 10’s parental controls. Considering this fact, below please find a full tutorial that anyone and everyone can refer to in order to establish parental controls on Windows 10 based on their personal preferences:
Stage 1: Creating a user account for your kid
User accounts are also slightly different on Windows 10, and the crucial change among the many amendments that can be evident in this section is the chance to generate separate user accounts for adults and children within one family. In the first place, in order to establish parental controls in Windows 10, you need to create a user account for your kid. To make it possible, simply:
- On your Windows 10 PC, go to the Start Menu and select Settings1.
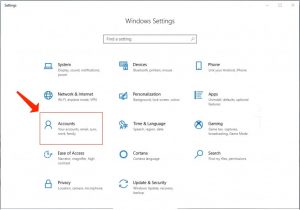
- Go to Accounts.
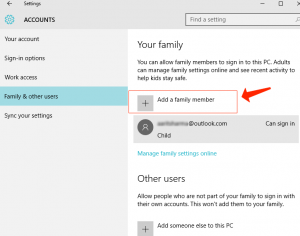
- Select Family & other users in the left section.
- In the right section, under your family, choose Add a family member.
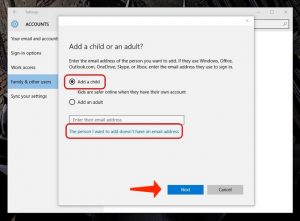
- In the contextual dialogue box that comes up, choose Add a Child.
- In the last box, specify the email address for your child’s Microsoft account. In case your kid doesn’t have one, you can generate a new Microsoft account for them by using the link straight below the email address box.
- Select Next, and then choose Confirm.
An invitation will be forwarded to the Microsoft account2 you signed your kid up using. Log into that Microsoft account, open up the email and accept the offer. You won’t be capable of configuring any parental controls for your kid’s account until you finally accept the invitation.
The creation of a child account on a Windows 10 PC implies the availability of a Microsoft account – you can’t make a local account for your kid. The reason behind this quite controversial amendment is the truth that with a Microsoft account being related to a child account, establishing and fine-tuning parental controls is not only feasible but also a piece of cake and the parental controls that parent establishes can be right away applied to a different Windows 10 PC as soon as they set up an account for their kid with the same Microsoft account on it.
Pay attention to this guide: Your virus and threat protection is managed by your organization
Stage 2: Proceed to the Family Safety page
What to most customers is an inconvenience of Windows 10’s parental controls is the truth that they can only be established and tuned online. In order to move towards establishing parental controls for your kids’s account, you have to use the Microsoft Family Safety webpage. To make it possible, you can either:
- Refer to https://account.microsoft.com/family on an web browser of your selection.
- Log in with your own Microsoft account.
- Alternatively, on a Windows 10 PC that you are already signed into with your own Microsoft account:
- Go to the Start Menu.
- Select Settings.
- Choose Accounts.
- Select Family & other users in the left pane.
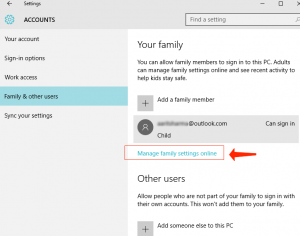
- Choose Manage family settings online under your family in the right section. This will reveal the Microsoft Family Safety page in a new tab of your PC’s default web browser.
Stage 3: Setting up parental controls for your kid’s account
Once you are on the Microsoft Family Safety page in a web browser, you will be capable of viewing all of the accounts that are related to your family. Choose your kid’s account to begin establishing parental controls for it. You may face quite a few various areas in the Family Safety webpage for your kid’s account, so it would be much easier when all of such components, and the implications of the parameters and toggles integrated into them, are explained to you individually.
The Recent activity area
This part of the Microsoft Family Safety page shows all of your child’s Internet browsing, app and game activities and PC usage activity via all of the Windows 10 PCs they have accounts on within the past 7 days. This area also has got two toggles in the upper section which are active by default but can be deactivated at any time by just turning them off. Such toggles are:
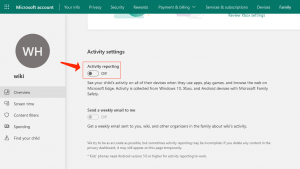
Activity reporting – Enables recording of all of your kids’ actions on all of the Windows 10 devices they have accounts on and the reflection of it in the recent activity area of the Microsoft Family Safety webpage.
Email weekly reports to me – The weekly reports of all of your kids’ actions during the week to your Microsoft account.
Web pages your child visits and the programs and games that they are involved in are all personally mentioned under the Web browsing and Apps & games areas of the recent activity page accordingly. You can restrict your kid’s access to any webpage, program or game you want by just clicking on the Block button immediately in front of its listing.
The Web browsing area
The Web browsing area has got two toggles:
Block inappropriate websites – Activating this toggle prevents your child’s access to undesirable resources, such as those that have got certain adult content.
Only see websites on the allowed list – Activating this toggle implies that your kid will only be capable of accessing webpages that you personally have put into the Always allow these list.
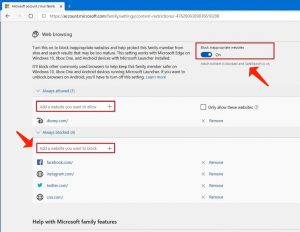
Additionally, in the Web browsing area are the always allow these and always block these lists of webpages. As implied by their names, your kid will always be permitted to access the webpages that you include into the Always allow these list and your kids’ access to the pages you add to the Always block these list will be permanently blocked. To delete a website from either list, just click on Remove in front of its listing.
Consider this guide: Website Notifications: Guide To Block
The Apps & games section
In this area, you can get convinced that your kid only runs programs and games that are suitable for their age. To make it possible, just open the dropdown menu in the Limit apps and games that can be used on this device area and choose the age group that your kid falls under. While you define the age category that your kid falls under, the permitted ratings for programs and games will be selected automatically.
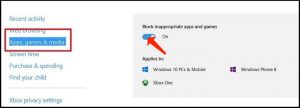
Any programs and games that you block via the Apps & games area of the recent activity page are mentioned in the Blocked apps & games area. You can delete any listings from this area to let your kid access the program or game that the listing was for. Plus, when your kid attempts to access a blocked program or game, you will get a permission request from your kid. All the blocked programs that you accept permission requests for are mentioned under the Allowed apps & games area of this page.
The Screen time section
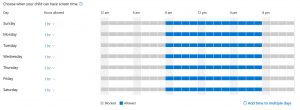
Last is the Screen time area of the Microsoft Family Safety page. Through the parameters found in this area, you can make the decision on how early and how late your kid can use the PC, as well as the maximum duration of time in one day they can use it for. This implies that even if you provide your kid with access to the PC within the entire day, you will still be capable of limiting the general duration of time they spend in front of the PC screen. Furthermore, the great thing is the privilege of defining various values for various days of the week!
User Review
( votes)References
- Settings (Windows): https://en.wikipedia.org/wiki/Settings_(Windows)
- How to create a new Microsoft account: https://support.microsoft.com/en-us/account-billing/how-to-create-a-new-microsoft-account-a84675c3-3e9e-17cf-2911-3d56b15c0aaf
