“Disk D: is not accessible. Access is denied” may appear in your Windows 11 after plugging someone’s disk into your system. Some people start thinking that it is related to some disk issues, but this problem is 100% software. Fixing it will take just a few clicks.
“Disk D: is not accessible. Access is denied”. Why does it happen?
This error is pretty widespread in the cases when you plug someone’s disk into your computer. It is a pity when you need to have extra storage or access data stored on the disk, but continue spectating the “disk is not accessible” window again and again. However, don’t be scared – the disk is not corrupted, and it is not a Windows 11 error, it just has an improper setup of access permissions.
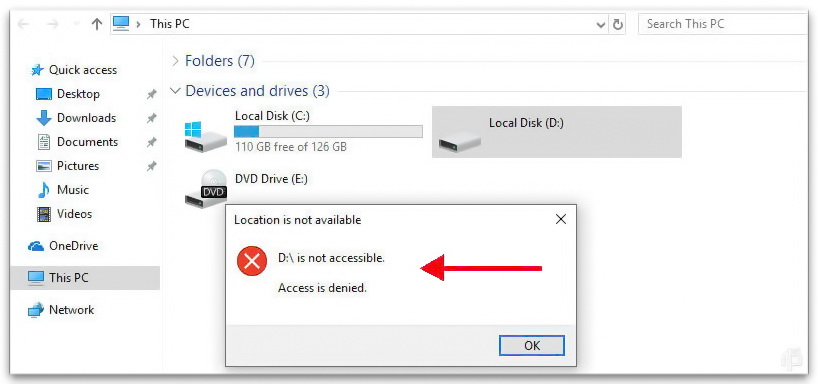
Disk drive D is not accessible
How to fix the “Disk D: is not accessible. Access is denied” error in Windows 11?
Since the disk is assigned as someone’s, you need to change this assignment in the disk settings. It can be done without using any additional software – just with the use of the Windows 11 interface. In fact, you will never face this problem when you are a single user of the computer with administrator privileges on your account. However, the users of simple user accounts will probably see this error each time they connect the disk that was in use.
To make the disk accessible and remove the “Disk D: is not accessible. Access is denied” error, you need to add your account to the list of ones that have an allowance to access the disk. Click the disk icon with a right mouse button, then press “Properties”:
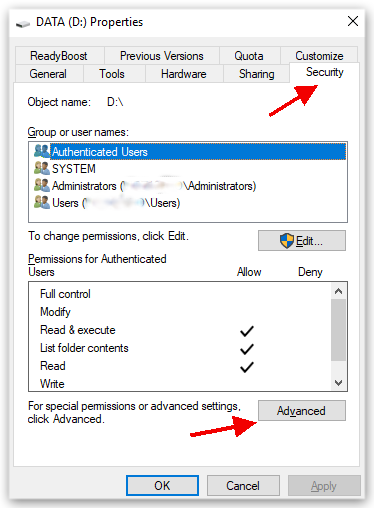
Default user permissions settings on the security tab Windows 10
Go to the Security tab. In it, choose the Advanced button. In the Owner line, you will likely see the “Unable to display current owner.” message. Click on “Change”, then type your username in the field. You need to carefully repeat your username – otherwise, the trick will not work.
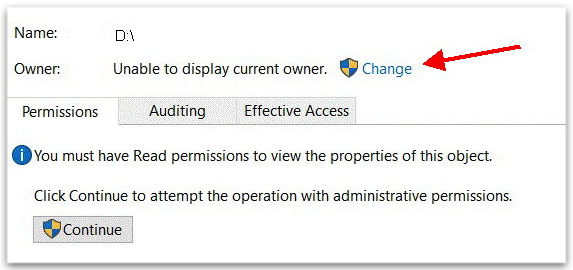
Unable to display current owner
Also, you can cancel all restrictions on disk usage. This action has some illusionary dangers, but it is pretty hard to get into a situation where these dangers will come into sight. In the same Advanced window, press the Add button in the lower-left corner. Then, press “Find now” and scroll the list and find the Everyone option. Click on it, and close the windows pressing “Ok” – to save the chosen configurations.
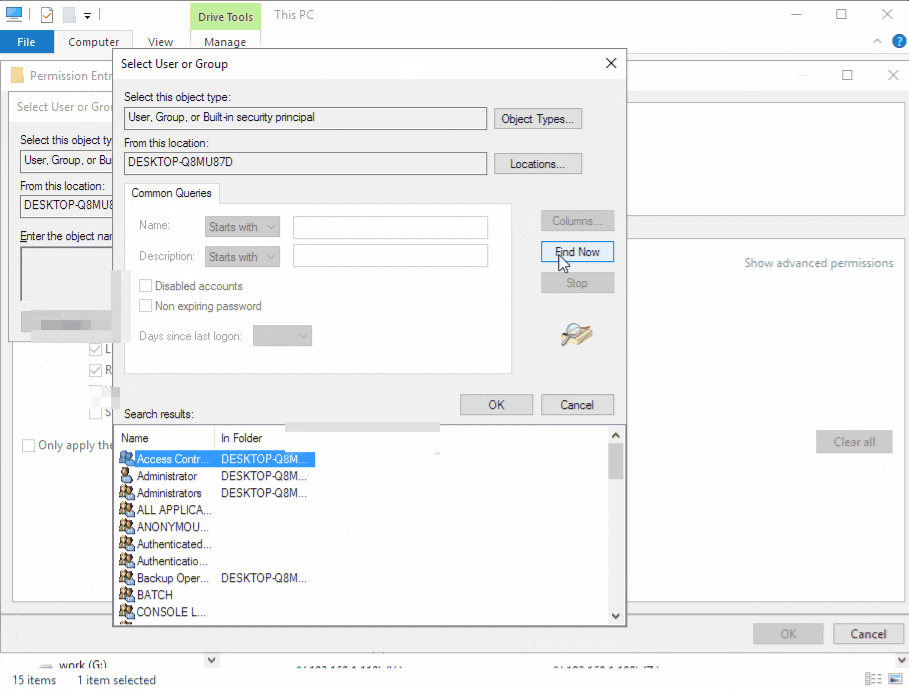
Add “Everyone” to the list of possible users of the volume
Why not Everyone?
Yes, this setup cancels all restrictions which makes the disk accessible on all computers it is plugged into. However, when the restrictions are set up to divide the volumes between users (User 1 can use only D:, User 2 – only E:), allowing everyone to interact with the disk will break this barrier. For home usage it is non-crucial, but when it comes to offices or universities, that may lead to unwanted consequences because of someone’s interest. Keep your privacy well!
Summary
Hopefully, this guide helped you to fix this notorious error known as “Disk D: is not accessible. Access is denied” and your Windows 11 no longer displays this message. We also hope that this guide helped restore access to the important partition on your HDD or SDD drive, and now you can investigate the available and occupied space without any troubles.1
User Review
( vote)References
- Read also about the solutions to solve this problem in Windows 10.
