
Flush DNS to resolve Internet connection-related troubles
Flush DNSCache operation is a thing that stands for getting your DNS cache clear. While browsing the Internet on any operating system, your PC saves the DNS-addresses automatically to the cache, in order to make further calls to this server more rapidly than it was at the first attempt. However, some DNS addresses may get outdated, or be broken because of incorrect saving. If your PC tries to connect to the site whose DNS address has such problems, you will see the INET_E_RESOURCE_NOT_FOUND error. Flushing the DNS cache will wipe out the entries that cause this error. This action is often used together with the IP renew/release operation.
“…I’m having an issue with a single website that is not displaying correctly in Chrome. I have cleared my cache, checked specific settings for that website, and also relaunched. It’s not displaying in Firefox or Safari either. What else can I try?”, — writes Twitter user @karlecco.
Regardless of the OS you use – macOS, Windows, or Linux, you can perform this action manually. Just follow the guidelines below; you can go exactly to the guide for the operating system you use through the Table of Contents.
The following guidelines demonstrate how to flush DNS on the below-said operating systems:
- Windows 10, 8.1, 8, 7, Vista, 2000, NT, XP, 98;
- MacOS versions from 10.6 (Snow Leopard) to 10.15 (Catalina);
- Linux;
- Ubuntu;
- Chrome.
Tips to Flush DNS Cache on Microsoft Windows
Windows 10
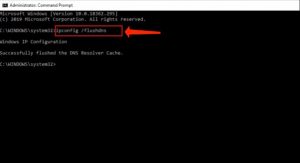
Fush DNS on Windows 10 is an easy command that must be entered in Windows Command Processor, also known as Command Prompt (CMD). You need to, however, open CMD with the Administrator’s right. This is what you ought to do.
- In Windows 10, apply Windows search and specify Command Prompt.
- Right-click Command Prompt and select Run as Administrator.
- In User Account Control pop-up, confirm by clicking on Yes.
- In CMD, specify ipconfig /flushdns and hit Enter.
Windows 8 / Windows 8.1
For flushing DNS on Windows 8 or 8.1, be sure to apply the Command Prompt with Admin’s rights. Perform these guidelines for clearing your DNS cache.
- In Windows 8/8.1, apply Windows search and specify Command Prompt.
- Right-click Command Prompt and select Run as Administrator.
- In User Account Control alert, click Yes.
- In CMD, specify ipconfig /flushdns and hit Enter.
Windows Vista / Windows 7
For flushing the DNS cache on Windows 7, you must open Command Prompt with the Administrator’s right. Below please find tips explaining how to do it.
- Click on Start > All Programs > Accessories and locate Command Prompt.
- Right-click Command Prompt and select Run as Administrator.
- In CMD, specify ipconfig /flushdns and hit Enter.
Windows XP / 2000 / NT / 98
In case you’re searching for how to clear DNS cache on previous Windows versions, there’s a much simpler solution. All you have to do is:
- Go to Start > Run >
cmd.exe> OK. - Specify ipconfig /flushdns and hit Enter.
Flush DNS Cache on MacOS
For clearing the DNS Cache on MacOS X systems, follow the milestones set forth below. Please pay attention to the commands displayed for various MacOS versions – not all of them are identical for every OS.
MacOS 10.15: Catalina
For flushing DNS on MacOS Catalina, do the following.
- Go to Terminal (Application › Utilities › Terminal or proceed Go > Utilities > Terminal)
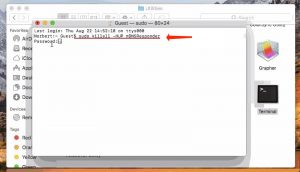
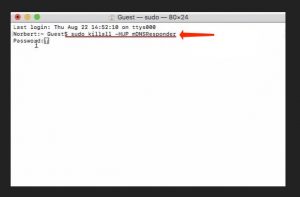
- Specify sudo killall -HUP mDNSResponder and hit Enter for running the command.
- Provide your password (it might not come up on the screen while you type).
- Hit Enter. Shut down the Terminal.
MacOS 10.14: Mojave
Flushing DNS on MacOS Mojave is a fast and simple process if you implement the below-given steps.
- Start Terminal (Application › Utilities › Terminal or proceed to Go > Utilities > Terminal).
- Specify sudo killall -HUP mDNSResponder and hit Enter to start the command.
- Indicate your password (it might not come up on the screen while you type).
- Hit Enter. Shut down the Terminal.
MacOS 10.13: High Sierra
Clearing the DNS on MacOS High Sierra can be performed by implementing these instructions.
- Start Terminal (Application › Utilities › Terminal or proceed to Go > Utilities > Terminal).
- Specify sudo killall -HUP mDNSResponder and hit Enter to execute the command.
- Provide your password (it might not come up on the screen while you type).
- Hit Enter. Shut down the Terminal.
MacOS 10.12: Sierra
If you would like to clear DNS on MacOS Sierra, refer to these guidelines.
- Start Terminal (Application › Utilities › Terminal or proceed to Go > Utilities > Terminal).
- Specify sudo killall -HUP mDNSResponder and hit Enter to execute the command.
- Provide your password (it might not come up on the screen while you type).
- Hit Enter. Shut down the Terminal.
MacOS X 10.11: El Capitan
For clearing the DNS on MacOS X El Capitan, implement the below-said steps.
- Start Terminal (Application › Utilities › Terminal or proceed to Go > Utilities > Terminal).
- Specify sudo killall -HUP mDNSResponder and hit Enter to execute the command.
- Provide your password (it might not come up on the screen while you type).
- Hit Enter. Shut down the Terminal.
MacOS X 10.10: Yosemite
For flushing DNS on MacOS X Yosemite, perform these steps.
- Start Terminal (Application › Utilities › Terminal or proceed to Go > Utilities > Terminal).
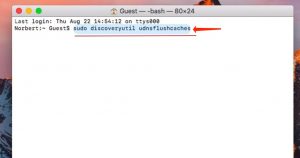
- Specify sudo discoveryutil udnsflushcaches and hit Enter to execute the command.
- Provide your password (it might not come up on the screen while you type).
- Hit Enter. Shut down the Terminal.
MacOS X 10.9: Mavericks
For flushing DNS on MacOS X Mavericks, perform these steps.
- Start Terminal (Application › Utilities › Terminal or proceed to Go > Utilities > Terminal).
- Indicate sudo killall -HUP mDNSResponder and hit Enter to execute the command.
- Provide your password (it might not come up on the screen while you type).
- Hit Enter. Shut down the Terminal.
MacOS X 10.8: Mountain Lion
For clearing DNS cache on MacOS X Mountain Lion, perform the below-said guidelines.
- Go to Terminal (Application › Utilities › Terminal or proceed to Go > Utilities > Terminal).
- Specify sudo killall -HUP mDNSResponder and hit Enter to execute the command.
- Provide your password (it might not come up on the screen while you type).
- Hit Enter. Shut down the Terminal.
MacOS X 10.7: Lion
For flushing DNS on MacOS X Lion, perform these steps.
- Go to Terminal (Application › Utilities › Terminal or proceed to Go > Utilities > Terminal).
- Specify sudo killall -HUP mDNSResponder and hit Enter to execute the command.
- Provide your password (it might not come up on the screen while you type).
- Hit Enter. Shut down the Terminal.
MacOS X 10.6: Snow Leopard and older versions
For flushing DNS on MacOS X Snow Leopard and older versions, undertake these steps.
- Start Terminal (Application › Utilities › Terminal or proceed Go > Utilities > Terminal).
- Specify sudo lookupd -flushcache and hit Enter to start the command.
- Provide your password (it might not come up on the screen while you type).
- Hit Enter. Shut down the Terminal.
Flush DNS Cache on Linux or Ubuntu
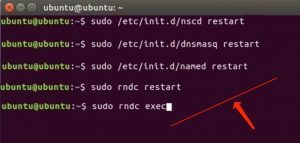
Linux
- Start Terminal by means of the Ctrl + Alt + T hotkey.
- Linux suggests several commands for DNS flushing, for instance:
- For clearing nscd DNS cache: sudo /etc/init.d/nscd restart;
- For clearing dnsmasq DNS cache: sudo /etc/init.d/dnsmasq restart;
- For clearing BIND DNS cache, apply one of the below-said commands:
- sudo /etc/init.d/named restart;
- sudo rndc restart;
- sudo rndc exec.
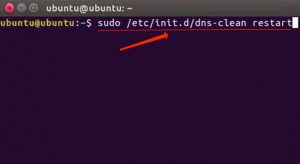
Ubuntu
- Start Terminal by means of the Ctrl + Alt + T hotkey command.
- Specify the following command: sudo /etc/init.d/dns-clean restart and hit Enter.
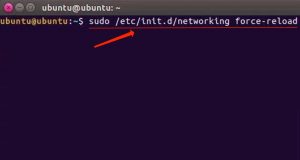
- Then, specify sudo /etc/init.d/networking force-reload and hit Enter.
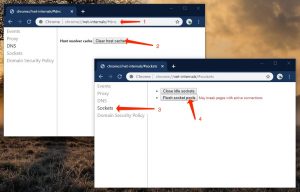
How to Flush DNS Cache on Google Chrome
Google Chrome browser contains a built-in caching system. For clearing DNS cache on Chrome, perform these steps.
- Start the Chrome browser. Copy and paste the below-said line into the Chrome address bar, then hit Enter.chrome://net-internals/#dns
- Choose to Clear host cache.
- Then click on Sockets.
- Click Flush socket pools.
In case you would like to clear DNS cache on other browsers, for instance, on Firefox or Safari, we believe that resetting them is a proper solution.
Done! We hope that our tutorial on flushing DNS on Windows, Mac, Linux, Ubuntu, or Chrome was beneficial to help you resolve the issue.
![]() German
German ![]() Japanese
Japanese ![]() Spanish
Spanish ![]() Portuguese (Brazil)
Portuguese (Brazil) ![]() French
French ![]() Turkish
Turkish ![]() Chinese (Traditional)
Chinese (Traditional) ![]() Korean
Korean ![]() Indonesian
Indonesian ![]() Hindi
Hindi ![]() Italian
Italian
Leave a Comment