
Kernel Security Check Failure errors in the Blue Screen of Death implies that a certain file did not pass integrity or compatibility verification on Windows. In most cases, the issue is caused by a troubled driver or RAM and may be repaired. The typical repairs for this issue include updating or substituting damaged files.
Customers who encounter the issue of “Kernel Security Check Failure” normally also claim that they have recently updated Windows or upgraded their RAM, or switched on USB tethering. We have also paid attention to the fact that many customers on Reddit claim KERNEL_SECURITY_CHECK_FAILURE overclock relation. The error alert normally states:
Certain customers have also claimed to encounter Kernel Security Check Failure during the installation of Windows 10. In case you are one of them, be patient. In this tutorial, we’ll review all solutions to repair the trouble considering the most typical causes.
Typical reasons for the Kernel Security Check Failure trouble:
- Outdated drivers (the most typical reason);
- Random Access Memory (RAM) damage;
- Malware contamination;
- Corruption of Windows OS files;
- Antivirus utilities;
- Hard disk damage;
- Viruses.
The good thing is that you can repair the issue on your own. Just follow the guidelines set forth below. You might have to refer to several solutions until you develop the one applicable to your particular case.
Keep in mind that many online guides will instruct you to proceed to Windows Settings or refer to the Windows Start button. Nevertheless, in some examples, customers go into a reboot loop and can’t even get these options to apply. Be patient – this guide reviews all possible combinations.
REPAIR KERNEL_SECURITY_CHECK_FAILURE (WINDOWS 10,8,7)
Access Windows system or prevent it from rebooting by default
In certain instances, customers who experience the KERNEL_SECURITY_CHECK_FAILURE issue cannot implement any of the solutions to repair it since the OS just crashes and restarts in a loop. If this is what is happening with your device, then you must undertake two steps before implementing any solutions:
- Reboot your workstation in Safe Mode with Networking. Inspect our tutorial on that or just begin hitting F8 while your workstation loads and select Safe Mode with Networking in the Advanced Boot Options menu.
- Prevent Windows from restarting by default. You can learn how to do that here. Another recommendation is to operate in a quick manner because you have to repair the issue before Windows makes the decision to start automatically again. You might have to do it repeatedly before you eventually manage to do that.
Solution 1. Updating drivers by means of the Device Manager
You do not require any exceptionally superb paid driver updater application to repair and refresh your PC’s drivers to repair the BSOD.
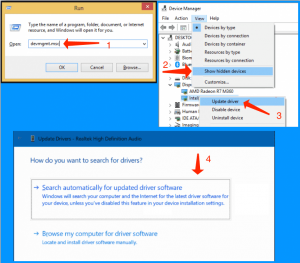
- Use the Windows key + R and specify devmgmt.msc into the Run prompt. Hit Enter. This starts Device Manager, which we’ll apply to update the outdated drivers.
- In Device Manager, select View > Show hidden devices.
- At this point, expand each category by means of clicking the little arrow near the device categories. Right-click on drivers and select Update driver.
- Select Search automatically for updated driver software. Follow additional guidelines on your screen and install driver updates recommended for you.
Apart from this step, we also suggest installing fresh Windows updates. For this purpose, follow the next solutions.
Solution 2. Installing Windows updates
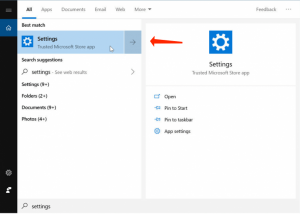
- In Windows search, specify settings and click on the matching result.
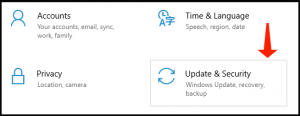
- Proceed to Update & Security area.
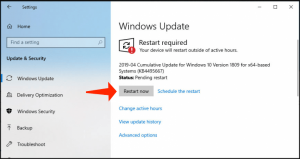
- At this point, hit Check for Updates and hit Restart Now to install the fresh Windows updates.
Solution 3. Refer to the Windows Memory Diagnostic tool
Windows Memory Diagnostic Tool stands for a utility that can help you identify RAM-related troubles and fix them.
- Apply Windows search to locate Windows Memory Diagnostic.
- Choose Restart Now and check for problems (recommended).
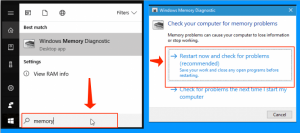
- Take time until the PC reloads to check the test results. In case they don’t automatically come up on the screen, right-click Windows icon on the system tray and proceed to the Event Viewer.
- Next, refer to Windows Logs > System. In the right area, select Find and specify memorydiagnostic. Click the matching result and inspect the available details.
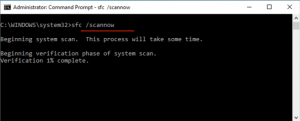
Solution 4. Initiate the system scan
- Launch Command Prompt with Administrator’s rights: specify cmd in Windows search, right-click Command Prompt and select Run as Administrator. Click Yes in the further pop-up box.
- At this point, specify the below-said command: sfc /scannow and hit Enter.
- Reboot your PC and inspect whether issue still remains.
Solution 5. Scanning Disk for Errors and fixing them
- Specify CMD in Windows search, right-click the appropriate result and select Run as Administrator. In the UAC window, select Yes.
- In Command Prompt, specify the below-given text:
chkdsk C: /f /r
This command locates and repairs detected troubles on disk, finds bad sectors and recovers bad data.
You might experience an error indicating that the disk is in use. Just Type Y and hit Enter; this reassigns the scan and initiates it after the next PC reload.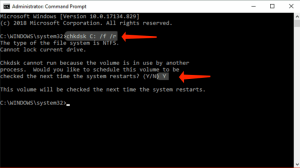
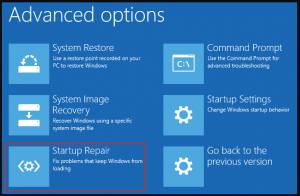
Solution 6. Fixing via Advanced Boot Options
You can fix the Kernel Security Check Failure on Windows 10 or 8 with Advanced Boot Options’ assistance. To go to the Advanced Boot Options, press down the Shift key while you select to restart your computer from the Windows menu. Another method to go to the Advanced Boot Options menu is to start hitting the F12 key on your keyboard during boot. As soon as you are in the Advanced Boot Options menu, implement these steps:
- Choose Troubleshoot > Advanced Options.
- Select Startup Repair.
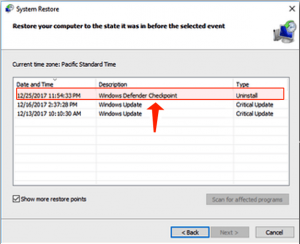
Solution 7. Refer to a restore point to promptly repair
In case you created a restore point manually or in case your PC is tuned to create them permanently, you can enjoy it now and recover your workstation to the status before the issue.
- Load into Advanced Boot Options as reviewed in the Solution 6;
- Proceed to Troubleshoot > Advanced Options > System Restore;
- Select a restore point formed before the error alert first began to disturb you and follow further guidelines on the screen.
Solution 8. Fixing the issue with BootCamp Assistant
The trouble can bother Mac clients as well. Customers have claimed to encounter this alert while running Windows on Mac devices via BootCamp. The following solution has assisted many customers to repair BootCamp:
- In the first place, delete the current Windows installation by means of the BootCamp Assistant.
- Reload System Management Controller (SMC) and Nonvolatile Random-Access Memory.
- Reinstall Windows 10.
- Inspect whether the issue remains.
Leave a Comment