
The mission of Windows Safe Mode: definition and examples of its application
The mission of Windows Safe Mode: definition and examples of its application Windows Safe Mode is a diagnostic Windows mode that loads the operating system with the most vital services, features, and crucial drivers. It’s worth mentioning that loading the PC in this mode is essential before you start fixing security-related problems, getting rid of malware, resolving errors, and other issues. Additionally, you can boot into UEFI/BIOS through Safe Mode – a helpful feature for laptop users.
“Trying a “reset” to see if that’ll fix it. Since I can boot into safe mode and everything seems fine, it would seem to be a problem in Windows itself.”, — writes Twitter user @textlesscosmos.
Booting Windows in Safe Mode launches a specific version with a limited set of utilities, basic drivers, and services needed to run the system. For example, suppose you had an error when using the OS in normal mode. If you start the system in safe mode and the error does not occur, then the default Windows programs, devices, or functions are not causing the problem. On this basis, booting in safe mode helps fix common errors. For example, Your PC Ran into a Problem and Needed to Restart or Video Scheduler Internal Error.
Initially, the most widely used remedy to load the Windows device in this mode was applying the F8 key repeatedly during system load, but now it is done differently. Thus, it is crucial to find the best solutions to start Windows in Safe Mode on Windows-powered PCs, irrespective of the manufacturer.
The mode is available in several options, each used to resolve various troubles, each set forth below.
- Safe Mode. Loads the PC with core drivers and main services.
- Safe Mode with Networking. Starts the device with core drivers and primary services and supplements the ones crucial for the Internet connection to work correctly. It is very beneficial when you believe you’ll need a troubleshooter or Internet access to download necessary data or specifically required updates.
- Safe Mode with Command Prompt. This solution is beneficial when the taskbar, Desktop, or Start menu refuses to load.
There are many remedies to load Windows in the above-said mode. Nevertheless, settings for different versions of the Windows operating system may vary insignificantly. For this reason, we suggest implementing the techniques elaborated solely for your Microsoft Windows version (7/Vista/XP, Windows 8 & 8.1, Windows 10, and Windows 11).
Steps to Load Windows in Safe Mode
Step 1. Apply the F8 key in Windows XP/Vista/7
When you use one of these previous versions of Windows, your method implies applying the familiar yet old F8 key.
- Hit the power button to switch on your device. Then you need to keep hitting the F8 key within the 1-second intervals. In other words, continue pressing the key repeatedly. Take time until your system shows the hardware data and initiates a memory test. Afterward, you will notice the Advanced Boot Options menu on your screen.
- The next step is to apply the arrow keys on your keyboard for the appropriate navigation. Make the option to load Windows in Safe Mode (commonly, with Networking or with Command prompt). Press Enter for verification of your choice.
- Take time until your computer loads. Fulfill your assignments in the above-said Windows mode. The next step is to go back to the regular mode, implementing steps 1-3 but instead choosing to Start Windows Normally in this instance. Press Enter for confirmation of your choice.
Step 2. Refer to the assistance of System Configuration panel in Windows 7/8/10/11
This step is grounded on the System Configuration panel and boots into your chosen mode until you decide not to. It functions for Windows 7, 8, 10 & 11. This is the most straightforward remedy to load Windows 10 and 11 into Safe Mode.
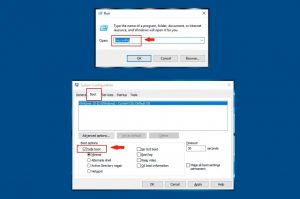
- To load the System Configuration panel, press Windows key + R. Once in the Run prompt, type msconfig, and hit Enter.
- Proceed to the Boot tab and research the Boot options. Choose the Safe boot and then choose the solution you want.
- Minimal one simply loads into Safe mode;
- Alternate shell loads into the mode with Command Prompt;
- Active Directory repair loads into a mode that helps to fix the Active Directory server;
- Network loads into the mode with Networking.
- Upon selecting the mode, choose Apply and OK.
- You will be instructed to load the PC. Select Restart to verify your choice. The computer now loads into the mode you selected. If you would like to exit the safe mode and refer back to the common one, repeat the steps 1-4, be sure you deactivate the Safe Mode option in System Configuration > Boot tab.
Step 3. Access the troubleshooting utilities
In times when you are looking for a remedy to load to Safe Mode in Windows 11, 10 and 8, then you must definitely consider the steps reviewed below. Initially, choose an approach to proceed to the troubleshooting utilities – depending on whether you can boot the operating system or not. The guide provided below reviews both situations.
Step 3.1. Referring to the troubleshooting utilities
When your device boots normally, attempt starting it in Safe Mode (Windows 8, 10 or 11) without hitting the F8 key.
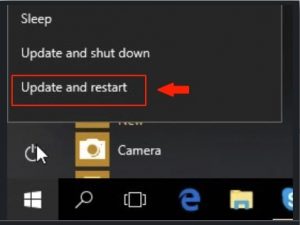
- All you are required to do is to switch your device on and hit Restart while you hold the Shift key. You may locate the Restart button in the login screen or the Windows menu (as displayed below).
- Another remedy to get to the safe mode is by means of the Windows Settings. Hit Windows + I key altogether; this shows the Settings window. At this point, locate an option titled Update and Security, and select it. Next, proceed to the Recovery tab. You will encounter the Advanced Startup panel, choose Restart Now below it.
Nevertheless, if your computer does not boot properly at all, you need to refer to one of the following remedies.
When you are having trouble starting the operating system, attempt loading from a USB recovery drive, you can create one using an extra PC. You might also refer to the approach with an F8 key. Still, it does not work well in all the situations – whether it works well or not may vary considering your PC manufacturer. Whatever solution you select to get to the recovery mode will help you start Windows in Safe Mode.
Step 3.2. Application of the troubleshooting options
The steps explained above will give you access to a specific menu where you can make your choices from the available troubleshooting tools. In this section, select Troubleshoot, followed by Advanced options. Next, select Startup Settings (or Windows Startup Settings). The next step is to choose the Restart button. The next step is to choose one from F1-F9 buttons, considering what you have in mind to do (for instance, F4, F5 or F6).
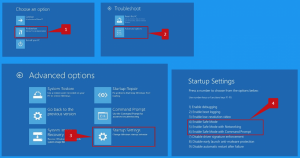
Do not get confused if after restart your computer displays a black screen with similar options – use the arrow keys to choose the relevant version of Safe Mode, and just press Enter to continue.
Step 4. Force use of the Automatic Repair mode in Windows 10 and 11
Breaking the regular Windows boot three consecutive times immediately shows the Automatic Repair mode. You may then choose this mode to load Windows in Safe Mode while booting. To start the Automatic Repair mode, you have to interrupt the regular Windows startup three times, one after another. Then refer to the below-given instructions with caution.
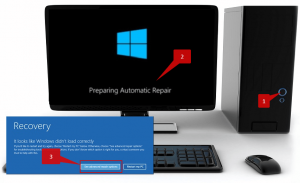
- To terminate the booting process, use the Power or Reset buttons. When you choose the Power button, you need to keep it pressed for at least 4 seconds to switch the PC off in a forceful manner. Next, turn on the device, force shut down again. You need to power on – force shutdown (terminate the startup) three consecutive times.
- You will notice that Windows tries to get to the Automatic repair mode when it displays “Preparing Automatic Repair” on the desktop.
- You may be instructed to choose the user account. Choose the one with admin’s privileges, and indicate the password to use it.
- Take time until Windows boots. When asked whether you would like to restart or enter Advanced options, choose the second option.
- Implement the instructions rendered in Step 3.2.
Read also: System Restore for Windows 10. How to create System Restore Point?
When you are using Windows 10 and you are having trouble with the blank device’s screen, we suggest checking the tutorials and guidelines provided in official Microsoft.
![]() German
German ![]() Japanese
Japanese ![]() Spanish
Spanish ![]() Portuguese (Brazil)
Portuguese (Brazil) ![]() French
French ![]() Turkish
Turkish ![]() Chinese (Traditional)
Chinese (Traditional) ![]() Korean
Korean ![]() Indonesian
Indonesian ![]() Hindi
Hindi ![]() Italian
Italian
Leave a Comment