
Welcome to our comprehensive guide on performing a system restore in Windows 11. Whether you’re looking to create restore points, disable the function, or understand how long the process takes, we’ve got you covered.
Quick Guide
🤔 What is System Restore in Windows 11?
System Restore is a valuable feature in Windows 11 that allows you to revert your computer’s settings, apps, and system files to a previous state. This can be particularly helpful if your system experiences unexpected issues or errors.
💡 Creating Restore Points
Before making any significant changes to your system, it’s wise to create a restore point. A restore point serves as a snapshot of your system’s current state. In case something goes wrong, you can easily revert to this point.
🔥 Performing System Restore in Windows 11
If you’re facing problems and need to restore your system, follow these steps:
- Search for “System Restore” in the Windows 11 search bar.
- Select “Create a restore point” to access the System Properties window.
- In the System Protection tab, click “System Restore”. Follow the on-screen instructions to complete the process.
❌ Disabling the Function of System Restore
If you want to disable the System Restore function, follow these steps:
- Search for “Create a restore point” in the Windows 11 search bar.
- In the System Properties window, uncheck the “Turn on system protection” option for the desired drive.
- Confirm your choice and click “Apply”.
⌛ Duration of System Restore
The time it takes to complete a system restore can vary based on factors such as the amount of data being restored and the performance of your hardware. In general, the process may take anywhere from several minutes to an hour.
System Restore from Boot
If your Windows 11 system isn’t starting properly, you can initiate a system restore from boot:
- Boot your computer and press the necessary key (e.g., F11, F12) to access the boot menu.
- Select “Troubleshoot” > “Advanced options” > “System Restore”.
- Follow the prompts to restore your system to a previous point.
Like all previous versions of the Microsoft operating system since Windows Millenium Edition, the 2021 Windows 11 features an option of restoring a last viable system condition. We have already published a tutorial on creating a restore point in Windows 10. In this article, you’ll get a short but essential manual on turning this function on in Windows 11, using it in its auto-mode, setting restore points manually, and making a restore.
Why do you need a system restore at all?
It is hard to overestimate the presence of the system roll-back option. Like any other safety measure – it seems to be overkill until you need it. Then, if something happens to your system, you thank heavens and developers for the feature. System restore is of great help if system or program updates you install turn out to be glitchy or entail software conflict for some reason. The same goes for system settings that you can even forget that you’ve changed.
System Restore vs In-Place Repair
What’s the difference between the system restore procedure and system repair install, you may ask1. The latter replaces current system files with the well-working variant of these files previously saved by the user or with the files provided by the Microsoft cloud. However, repair-install relates to system files only. Moreover, if you execute the in-place repair locally, the updates you are getting will date back to the time of your last reservation.
System Restore acts a little differently. Firstly, it affects not only system files and settings. It also restores the programs and files of many types. Secondly, you can have as many restore points as you want. Automatic mode allows you not to bother making saves by yourself but rely on automatic restore point creation before every update.
Enabling Windows 11 System restore
Why is Windows 11 System Restore off by default if it is that good? Legit question, actually. System restore is turned off by default because it requires reserved space on your hard drive and uses system resources for real-time monitoring and saving system states.
The quickest way is to type in the Start Menu search line “create a recovery drive” and click the found item.
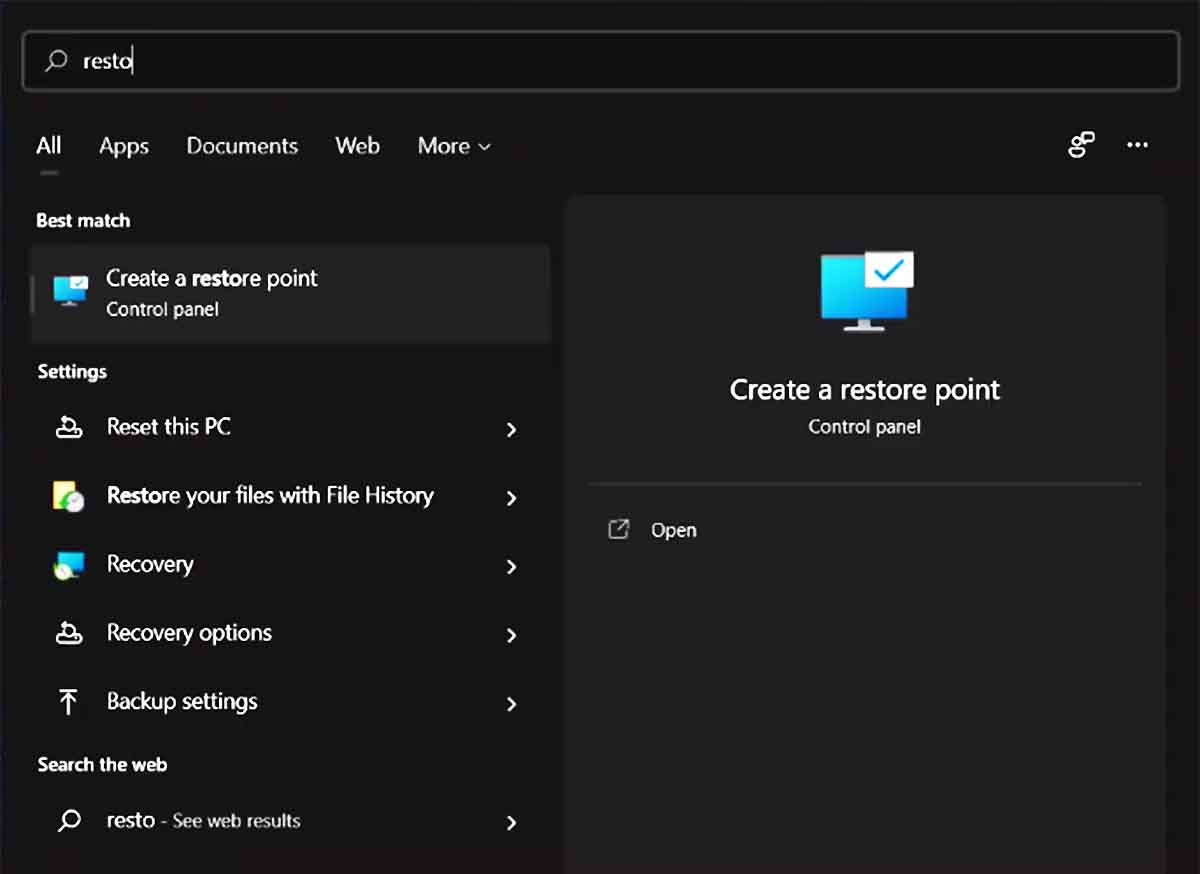
Type ‘restore’ in the search bar and you will get the needed item at once.
You will find yourself in the System Properties, in the System Protection tab. You will see Protection Settings section a little lower, where you will be able to choose the drives that you want to protect by restore points. Then proceed by clicking Configure.
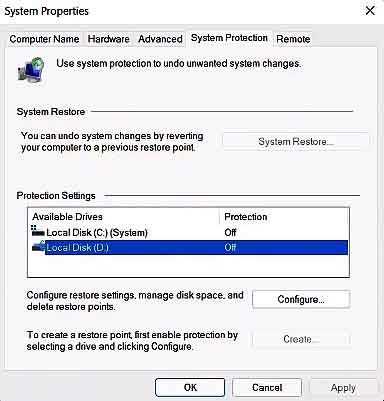
System Protection tab of the System Properties. This is the main place to start all restoration-related operations.
In the next window, switch the System Protection On and press Apply.
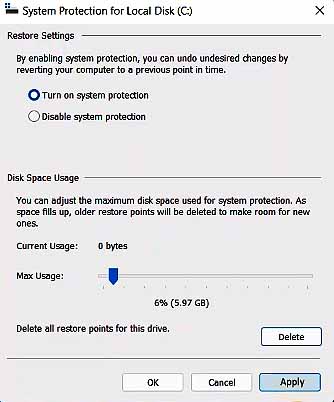
As you configure your restore point settings, decide how much disk space are you ready to dedicate to restoration needs.
By this, you will have enabled the automatic creation of restore points before any installation of updates.
Creating a restore point manually
You might want to create a restore point by yourself whenever you wish to. Use the same path shown above to access System Properties and press Create – the button at the bottom of the System Protection tab. You will be offered to name your restore point. Then proceed by clicking Create.
Does it restore everything? Not really. First of all, System Restore affects only certain types of files. Moreover, restoration is possible only on the drives you have previously chosen to be protected (in the System Protection tab of System Properties).
Recovering your Windows 11
If something happens to your system, you either can or cannot boot Windows normally.
If you can boot the system
— the scenario is simple.
Access System Properties, System Protection tab (you already know the way there), and click the System Restore button at the upper right. In the next window, you’ll be told that none of your personal files will be affected by the restoration procedure, but some updates may be rolled back and recently installed programs uninstalled. Not many choices here.
The next window asks you to choose a restoration point. You need the System Restore feature previously turned on to have any restore points in this list. If you have manually created any restore points – you will see the titles you gave them in this list too.
You can press Scan for Affected Programs to see which software will be uninstalled or somehow rolled back to its former state.
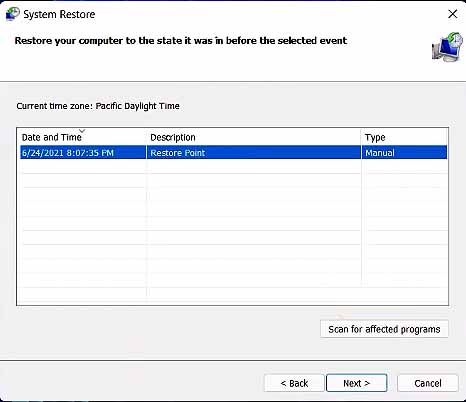
In the list of restore points you will see your manually or automatically created restore points.
Proceed to the next dialogue Window to choose the drives that will undergo the roll-back procedure. The number of drives offered depends on how many of them you have previously put under protection (in the Protection Settings). However, the crucial thing is to restore the Windows-containing drive. Restoring any other drive except the system disk is arbitrary. Proceed. Read a check-info before pressing Finish in the next window, and the restoration process will launch. The PC will reboot and roll back to the better state of your Windows 11.
If Windows 11 won’t boot
— it will be a little more complicated.
First of all, you need to get into your computer’s advanced setup. To do that you either press the Power sign at the bottom right of your screen as if you were going to turn off your PC. There, in the appearing menu, you have to click Restart holding Shift button. Upon the restart, you will be taken into Windows Recovery Environment.
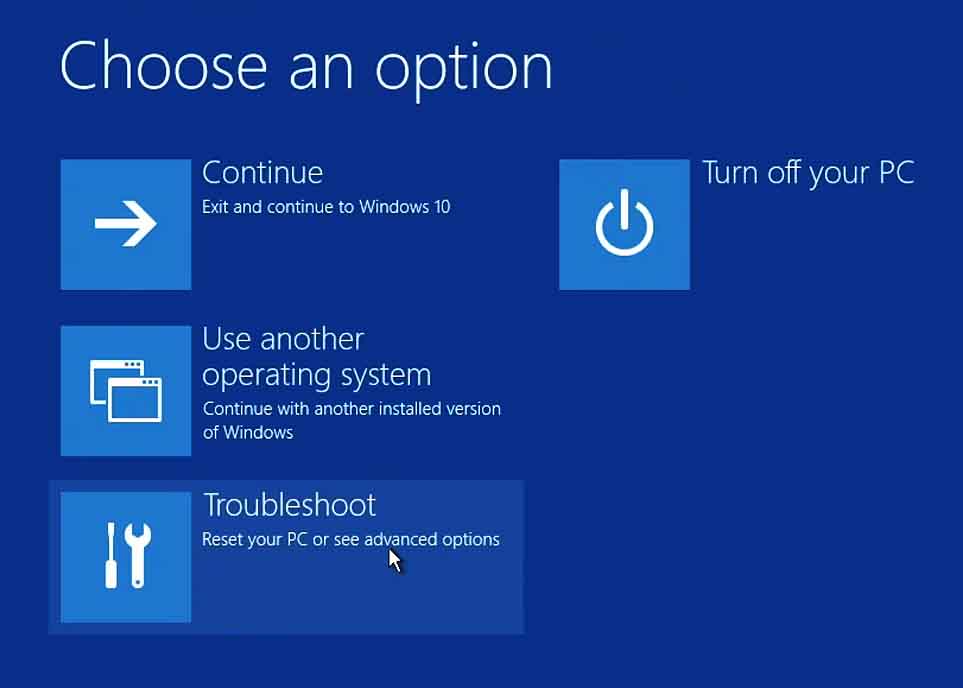
If your operating system won’t boot, but you do have restore points, you will need to get here.
An alternative way to get there is to switch your PC off when the Windows 11 loading screen appears. Do it several times and the computer will recognize this pattern as trouble and take you to the advanced setup.
As soon as you’re there, take this path:
Troubleshoot – Advanced Options – System Restore.
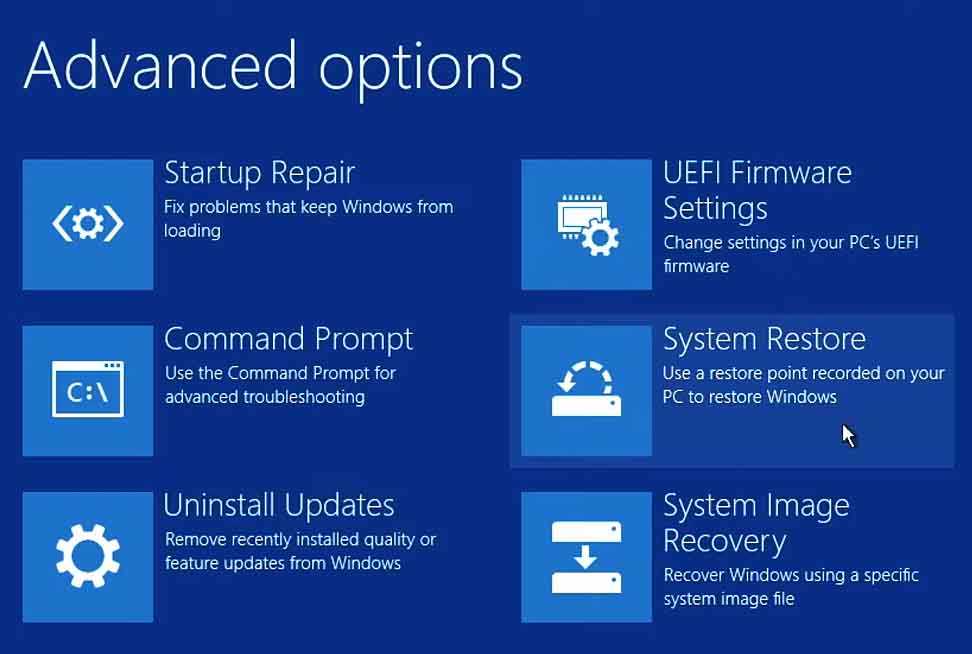
After you click System Restore you will be led through the same sequence of questions as if you were able boot your system.
After that, a System Restore window will appear and everything will be pretty much the same as in the previous case. Choose restore point, choose affected drives, confirm everything, and here you go!
Wait for Windows 11 to execute the rollback and enjoy your healed system.
Alternative Solutions
What can be a worthy alternative if your Windows 11 system behaves strangely? Yes, it might be a bad update, but it might also be a virus. If you aren’t up to spending your time rolling your system back, you might want to have a second option. Therefore, it is reasonable to have a decent anti-malware utility on your PC. GridinSoft Anti-Malware is one of the best solutions that can help effectively clean your PC of inhibiting agents. Malware can cause the system’s abnormal state, so why use a cannon against the sparrows.
By following these steps, you’ll have a better understanding of how to perform system restore in Windows 11, create restore points, and manage the function effectively.
FAQ
References
- If you wan’t to learn how to perform a repair install, you might want to read Part 3 in our article about Windows Defender updates troubleshooting.
![]() German
German ![]() Japanese
Japanese ![]() Spanish
Spanish ![]() Portuguese (Brazil)
Portuguese (Brazil) ![]() French
French ![]() Turkish
Turkish ![]() Chinese (Traditional)
Chinese (Traditional) ![]() Korean
Korean ![]() Indonesian
Indonesian ![]() Hindi
Hindi ![]() Italian
Italian
Hi, can you Help me.
I just got ransomware .bpqd file. so….
to find password my ID 8XhP2QUp4Iiex0nGxJ0xqdsjOBlx39gn4JE4JG2s
I want to save All My Data in Data D 🙁
Can you help me.. Please