Why does the INET_E_RESOURCE_NOT_FOUND Error occur?
INET_E_RESOURCE_NOT_FOUND error is nothing but a typical issue that does not allow customers to visit the web pages online. After the customers decide to install Windows 10 operating system updates, it often happens.
Microsoft Edge customers experience the issue most often, even though Google Chrome or Firefox customers experience it. The alert also informs that there was a temporary DNS issue and that the customer has to refresh the webpage. However, this may not be sufficient enough to resolve the problem.
Based on the facts mentioned via several web forums and websites similar to Reddit, the error alert generally pops up, for instance, when trying to open PDF documents, browsing web pages using IE or Microsoft Edge, or even any other browser available. The customers indicate that all they notice is a scary message reporting:
Hmm… cannot reach this page.

Make sure that you’ve got the correct address.

Details: There was a temporary DNS error.

Error Code: INET_E_RESOURCE_NOT_FOUND
It may be a very annoying factor for you to reveal that you cannot load your favorite pages anymore due to the issue in Internet Explorer 11 or Microsoft Edge. In fact, this issue normally happens almost as often as DNS_PROBE_FINISHED_NXDOMAIN error.
It is worth saying that the problem occurs and gets fixed on its own in some cases. Sadly, if you can’t wait until it is resolved or if it just keeps distracting you, try to undertake the measures provided below. Our experts have come up with several remedies to fix the INET_E_RESOURCE_NOT_FOUND DNS issue without the requirement to install any third-party software. Be sure to implement all the recommendations set forth below.
Fix “INET_E_RESOURCE_NOT_FOUND“: The Best Solution
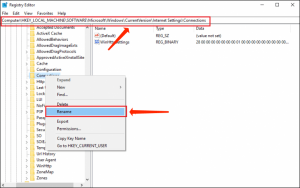
1️⃣ Renaming the “Connections” folder in Windows Registry
This is a 100% working method to fix the INET RESOURCE NOT FOUND problem. It was initially explained by our subscriber Tom K. and it is also an approved remedy by Microsoft. The issue may occur after installing the Microsoft Windows Creators update but can be resolved without complications. Be sure you log in to the Administrator’s account and implement the below-said steps.- Proceed to Windows Registry – then hold the Windows key + R and specify regedit into the Run prompt, then click OK. Then expand folders in the following sequence – HKEY_LOCAL_MACHINE > Software > Microsoft > Windows > CurrentVersion > Internet Settings > Connections.
- Then right-click on the Connections folder and amend its name to ConnectionsX. Click Enter to confirm the changes and save them.
2️⃣ Starting the Private Browsing session
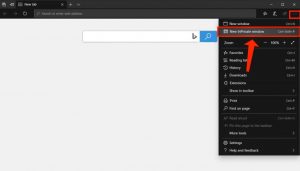
Another remedy to fix the INET_E_RESOURCE_NOT_FOUND Edge issue is starting a private browsing session. This solution could be effective only as a temporary remedy if you have to load a certain website quickly.
- Launch Microsoft Edge. The next step is to click on the three dots in the right upper area of the screen. Choose the New InPrivate window feature.
3️⃣ Modifying the User Account Control Settings
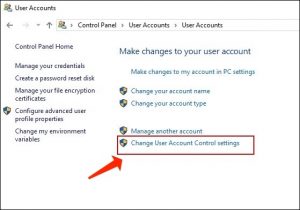
User Account Control value, or, in short, UAC settings, needs to be tuned in a certain way in order to help Microsoft Edge operate in a trouble-free way. For this reason, you ought to inspect whether UAC isn’t tuned to “Never Notify“. This might cause the INET_E_RESOURCE_NOT_FOUND 2021 trouble.
- Open Run.. window by hitting down Windows key + R at the same time.
- Next, specify control and hit Enter (or OK).
- Choose User Accounts, then in the next window, choose User Accounts.
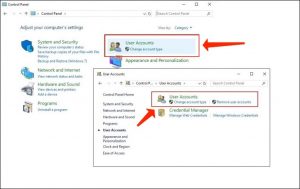
- At this point, you must be persuaded that the option you choose is the second one when counting from the top. Click OK to Save. Don’t forget to choose Yes to save the amendments.
4️⃣ DNS Flush
DNS Flush is yet another working fix that is known to be helpful when trying to repair the INET_E_RESOURCE_NOT_FOUND problem in Chrome, Edge, or another browser trouble. A simple way to do it is stipulated below. We also recommend inspecting our detailed tutorial on how to clear DNS cache considering several operating systems.
- Click on the magnifying glass icon placed in the taskbar, and then specify cmd in the search bar. As soon as you are in the results section, find Command Prompt. Don’t click on it with the left mouse button – click on it only with the RIGHT button. The next step is to choose the option Run as Administrator. If asked, specify the admin’s password.
- In the CMD section, specify ipconfig /flushdns and press Enter. Keep in mind that you need to provide space before the forward slash (/).
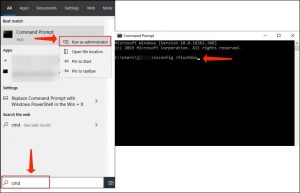
- As soon as the above-said steps are fulfilled, you will see “Windows IP Configuration. Successfully flushed the DNS Resolver Cache.” From now on, you can shut down the Command Prompt window.
5️⃣ Complete Reinstallation of Microsoft Edge
Steps 1-4 are not necessary if you do not intend to back up your Favorites in Microsoft Edge. However, if you need this information, please be sure to follow each separate step of this guide carefully for reinstalling Microsoft Edge in a proper way.
- Begin by creating a backup of your Favorites. For this purpose, open the Run window (hit Windows Key and R key at the same time on your keyboard).
- As soon as you are in the Run window, specify the below-said bolded text: %LocalAppData%\Packages\Microsoft.MicrosoftEdge_8wekyb3d8bbwe\AC\MicrosoftEdge\User\Default
- Then press Enter or click on OK.
- You will notice that the folder with some other folders soon appears. Select the folder named DataStore, then right-click on it and select Copy from the menu.
- The next step is to open any folder you would like (choose one where you can easily find the file later, for instance, Desktop) and then right-click on it with the help of your mouse > Paste it.
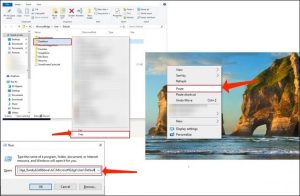
- The next step is to shut down Microsoft Edge fully. Be sure there are no Microsoft Edge windows that still remain open.
- Click on File Explorer (in the taskbar) and select the View tab. Put a tick in the checkbox of the Hidden items (through clicking on it).
- Copy the below-said text – C:\Users\YourUserNameHere\AppData\Local\Packages and specify it in the File Explorer’s Quick Access bar, but before you hit Enter to access the path, replace the YourUserNameHere area with your device’s username.
- Find a folder nominated as Microsoft.MicrosoftEdge_8wekyb3d8bbwe. Right-click on it and select Delete from the menu. Prove your choice by clicking on Yes. In case the system fails to delete some files, simply click on Skip repeatedly.
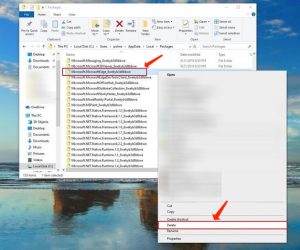
- Once the files are deleted, restart your workstation. Take time until it completely loads before proceeding to the next step.
- Search for the magnifying glass icon, click on it to open search, and specify powershell. Once the WindowsPowershell pops up in the search results, place the PC mouse over it, right-click on it, then select the option to Run as Administrator.
- Once the Powershell comes up, specify: cd C:\ and hit Enter. Next, specify cd C:\users\YourUserNameHere (once again, indicate your real PC username in this area) and press Enter. The next step is to copy the following lines and specify them in the Powershell area:
Get-AppXPackage -AllUsers -Name Microsoft.MicrosoftEdge | Foreach {Add-AppxPackage -DisableDevelopmentMode -Register “$($_.InstallLocation)\\AppXManifest.xml” -Verbose}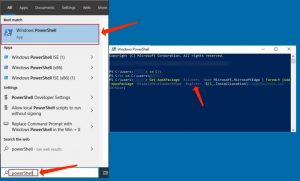
- Press Enter and take time until the process is completed. The next step is to restart your system. The “INET E SOURCE NOT FOUND” issue should be now repaired.
6️⃣ The last tip – resetting the Netsh
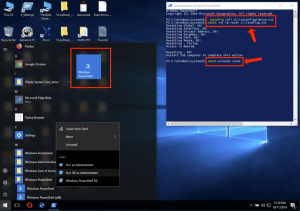
The solution provided below resets IP settings, so in case you use a static IP, be aware of the fact that the parameters will be refreshed. If you would like to save your IP configuration, be sure to complete the steps reviewed below.- Right-click on Windows icon in the taskbar and choose Windows PowerShell (Admin). Choose Yes to apply the amendments.
- In the Powershell, specify the below-said command: ipconfig /all > C:\ipconfiguration.txt . This will save your current IP values.
- The next step is to copy and paste the below-said command: netsh int ip reset c:\resetlog.txt and press Enter;
- Then, copy and paste this text: netsh winsock reset and press Enter;
- Restart your PC.

