Release and Renew IP address to repair connectivity issues
Every computer connected to a network has its Internet Protocol address (IP address) to identify and communicate with other computers. While most computers automatically obtain an IP address assigned by a server running a service called Dynamic Host Configuration Protocol (DHCP), some IP addresses require manual configuration (each computer is set manually, including its IP address on a given network). Usually, this process of obtaining/assigning an address is automatic. However, there may be cases where it does not work as it should.
Releasing/updating the IP address is an action that can solve some connectivity problems. You can do this regardless of your OS. So in Windows, you can do it through the command line, while MacOS offers a graphical interface. Removing the old IP address can quickly solve connectivity problems. The first command for Windows, which we will explain in the text, is ipconfig /release. It makes the system forget your “old” IP and mark it as free on the DHCP server. The second, ipconfig /renew, ask the DHCP server for a new IP address for your device.
“Any workarounds to logging into Fortnite right now? Been trying non-stop, but haven’t been able to login since the event. Still really looking forward to trying out those lightsabers!!”, — writes Twitter user @NickEh30.
These commands are used widely for fixing networking issues since they are working despite all changes in Windows done since Windows XP was released.
Release/Renew IP commands are usually finalized by the Flush DNS command, which releases the DNS cache and submits requests to apply new IP address data.
Refer to the tutorial below for releasing and renewing the IP address on Windows 11, 10, 8, 8.1, 7, Vista, XP, Mac, and Linux. Also, ensure your network adapter is tuned correctly to obtain an IP address automatically. Otherwise, the above-said commands won’t function well.
Guidelines to Release and Renew IP Address on Windows, Mac, Linux
Windows 11, 10, 8.1 and 8
You can refer to the steps reviewed below for releasing and renewing the IP address on Windows 8, 8.1, 10, and 11.
- In Windows 11, 10, 8 or 8.1, apply Windows search to locate Command Prompt.
- Right-click on Command Prompt and choose Run as Administrator mode.
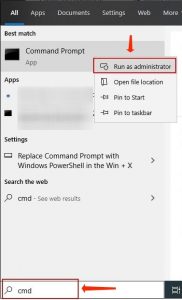
- In User Account Control alert, select Yes.
- In CMD, type ipconfig /release and hit Enter.
- Then, specify ipconfig /renew and hit Enter.
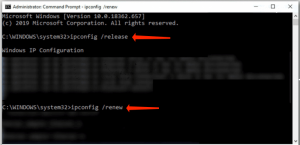
- Take time until the DHCP server sets a new IP address to you.
Windows 7 and Vista
Refer to these steps to apply ipconfig /release and ipconfig/renew commands on Windows 7 or Vista.
- Click on Windows menu, then specify cmd in Windows search bar.
- Right-click the Command Prompt option and select Run as Administrator via the menu.
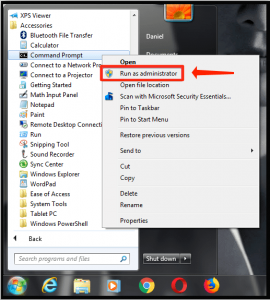
- In User Account Window, select Yes.
- Then, specify the following command in the Command Prompt: ipconfig /release and hit Enter.
- Indicate ipconfig /renew and hit Enter.

Mac OS
- Refer to the Apple logo in the top-left area of the display and choose System Preferences.
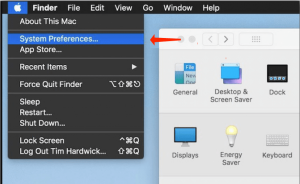
- Proceed to Network.
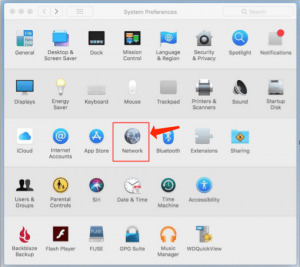
- In the left section, choose Wi-Fi or Ethernet (based on which one you use by default). Next, select the Advanced… button on the right of the Network menu.
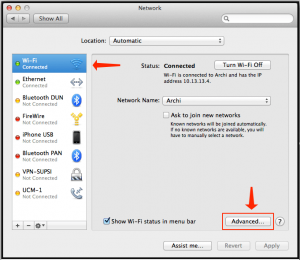
- Choose TCP/IP tab. At this point, you will notice that Configure IPv4 is tuned to Using DHCP. Choose the Renew DHCP Lease button.
- Take time until you encounter an amendment in IPv4 address. The procedure is completed now.
Linux/Ubuntu
The tutorial below gives an equivalent of ipconfig /release and ipconfig /renew commands on Linux. Refer to these steps to force DHCP Client to Renew the IP Address.
- Use the CTRL+ALT+T hotkey command to start the Terminal on Linux.
- In Terminal, specify sudo dhclient – r and hit Enter for releasing the present IP.
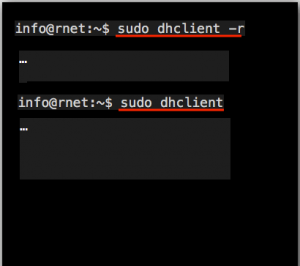
- Next, specify sudo dhclient and hit Enter to obtain a new IP address via the DHCP server.
Helpful DNS Resolver Commands for Windows
A part from the Renew and Release IP commands, you might decide or have to apply some of the commands set forth below.
- ipconfig /flushdns. This command aids in clearing the DNS Resolver cache so that the new IP data would be delivered right away.
- ipconfig /registerdns. This command refreshes all DHCP leases and assigns DNS names initially.
- ipconfig /displaydns. Displays present contents located in DNS Resolver Cache.
Repair IPconfig release renew not functioning
IPConfig /Release and /Renew commands functions only when your network adapter is tuned to obtain the IP address automatically. To say it differently, you ought to have DHCP activated. You can set these parameters using Windows Network and Sharing Center.
- Proceed to Network and Sharing Center, then choose Change adapter settings.
- Right-click your network adapter and select Properties.
- Locate Internet Protocol Version 4 ( TCP /IPv4) and select Properties.
- Choose Obtain IP Address automatically and hit OK for confirmation.

