You will be shocked, but establishing the video memory size (we specifically mean VRAM) in Windows 10 can be a significant challenge. Please continue paying attention to this guide on How to Check the VRAM Capacity
In case you were an expert on doing this in Windows 8 or in the previous versions of Windows 10, then there’s no guarantee that you will come up with an identical solution after the recent system updates. The operating system is modified regularly, and the “Settings” application gets new items.
“Trying to file a support request but I don’t know which video card I have (IE 3GB VRAM or 6GB VRAM SKU?) and the “Geforce Experience” app will only give me that information if I “log in”…”, — writes Twitter user @mcclure111.
We want to introduce a step-by-step tutorial on what measures have to be undertaken in the recent versions of Windows 10 to establish the amount of video memory of your external or internal graphic card. You will find out several working solutions to estimate the volume of the RAM of your video adapter (also known as VRAM) with the help of third-party applications.
There are certain kinds of video memory: system, dedicated, shared, etc. VRAM size is allocated memory. It shows the volume of memory available on your graphic card. If you have got an internal (system) graphic card, it will cut the memory from the RAM of your PC. Furthermore, you need to understand that you can define the size of memory in your UEFI BIOS. Typically, these parameters are in the Integrated Peripherals area.
How to inspect VRAM using the integrated Windows 10 utilities?
This is how to establish how much graphic memory your card has got in Windows 10 without third-party applications.
Read also: How to Reset TCP/IP Stack on Windows & Mac
Option 1 (simplest): check VRAM size in graphic adapter settings
This option helps to inspect the amount of video memory without third-party applications. Simply refer to these guidelines:
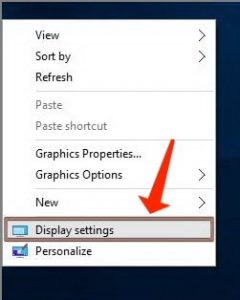
- Right-click on a blank section of your desktop. Choose Display Settings:
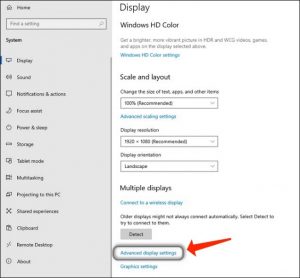
- Scroll down and go to the “Advanced Screen Settings” link in the bottom section of the page.
- Choose Display Adapter Properties on Display 1 (Display 2, etc.)
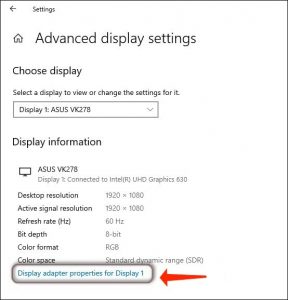
- Once you are in the next section, you can read the data about:
- The total graphics memory in place
- Dedicated video memory
- System video memory
- and shared memory
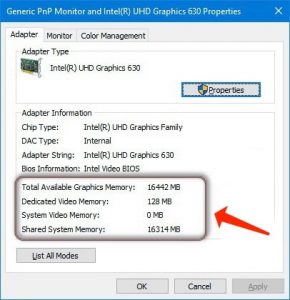
- You will encounter the results of VRAM inspection. As you may have found out, the total available memory is identical to the allocated plus the total.
Option 2: DxDiag
This is another Windows utility – DirectX Diagnostic Utility. Refer to the milestones:
- Hit the Win button on the keyboard
- Specify dxdiag.
- Hit Enter.
- Allow the tool to load completely.
- Go to the “Display” section.
- Locate Display Memory Information (VRAM)
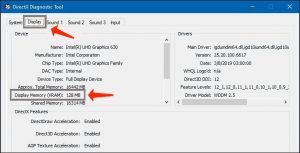
How to inspect the volume of video memory by means of the third-party applications
You may also establish the data on how much VRAM your graphic adapter has got by means of several third-party tools and programs for Windows 10.
AIDA64
In the first place, you have to download, install and launch the tool. Then implement the below-given procedure:
- Proceed to the display.
- Choose Windows Video.
- Choose a graphics card.
- Locate the Memory Size field and inspect its value:
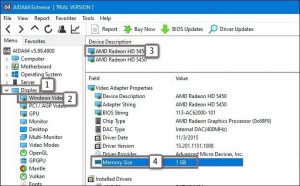
CPU-Z
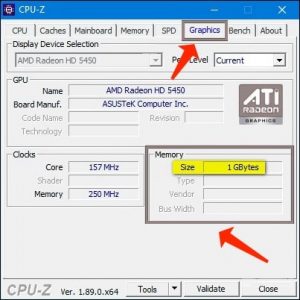
CPU-Z stands for one of the most beneficial applications for locating the data on CPU and RAM modules. Nevertheless, this application is also capable of establishing the features of video cards. This is what you do to check the size of dedicated video memory (VRAM):
- Start the utility.
- Proceed to the Graphics tab.
- Locate the “Memory” area, where the volume of the chosen video memory is shown in the “Size” section:
